Doors Revit Families
1. GENERAL INFORMATION
- Set name: Doors
- Version 1.2.0
- Revit version: 2019
Description
This set of Revit families is made for modeling doors and openings in Autodesk Revit.
Using families, you can design exterior and interior doors single, double, sliding doors, rotary, bi-fold, doorway with casing or not, doors with sidelites and so on.
Suitable for interior designers and architects. The geometry of the frame, door and other elements are made by the tools of Revit.
Loading and placing into the project
In order to view and download the families from the set, you can open the folder with family files and drag it into the project with the mouse.
IMPORTANT! Place doors only on the plan view, not in 3D (otherwise, an error may occur and Revit will not allow you to place the door).
2. SET STRUCTURE
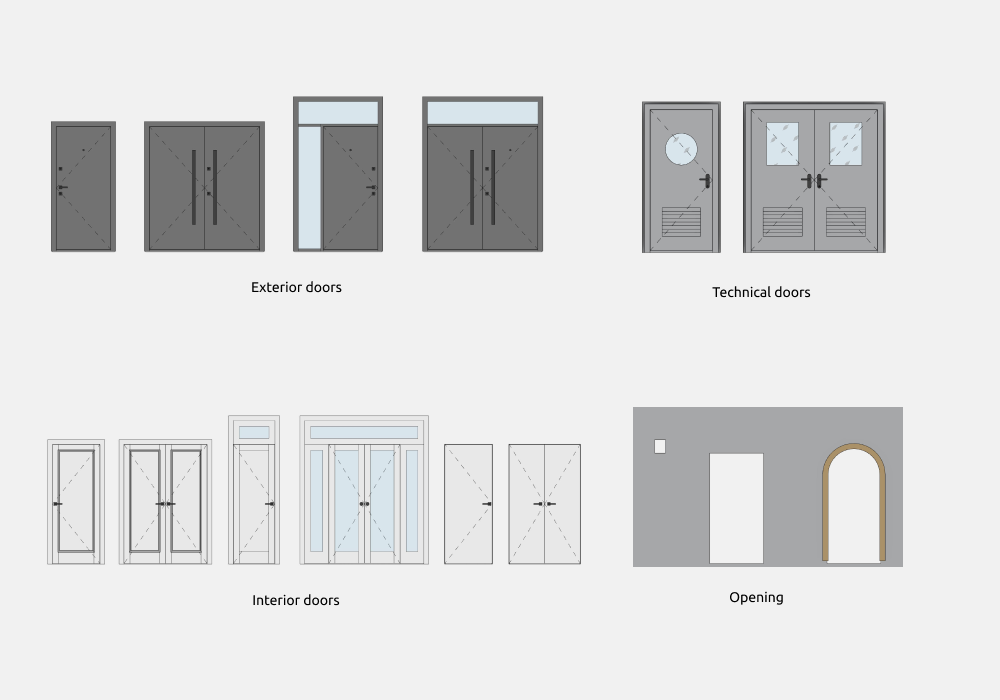
The set includes the following families:
Exterior door:
- Single
- Double
- Single with sidelites (transom)
- Double with sidelites (transom)
Interior door:
- Single
- Double
- Single with sidelites (transom)
- Double with sidelites (transom)
- Invisible
- Invisible double
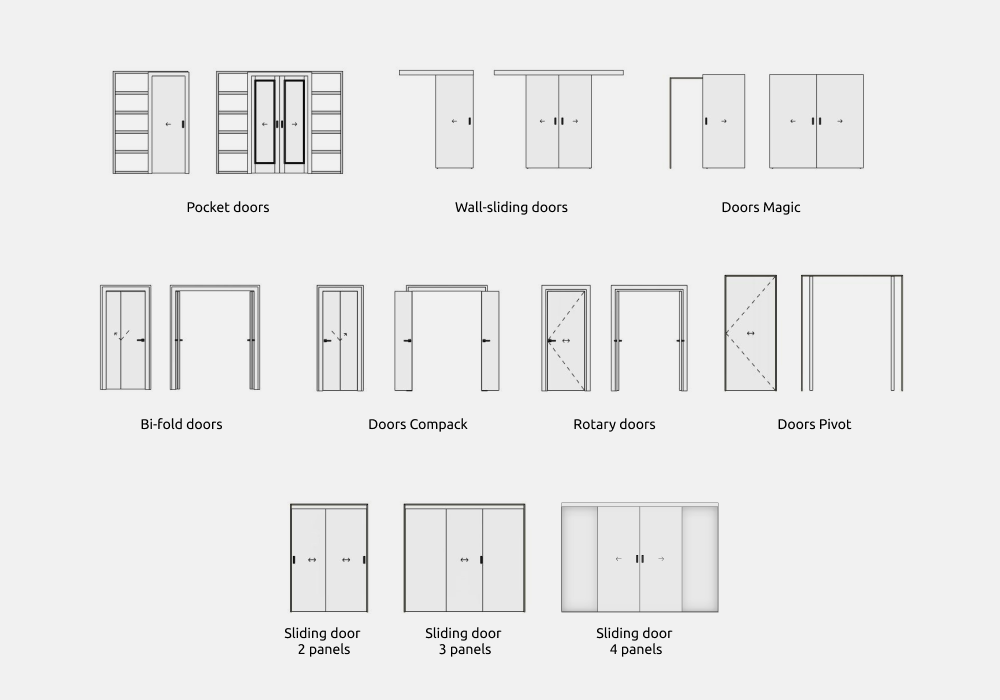
Sliding door:
- Pocket — single, double
- Bi-fold — single, double
- Compack — single, double
- Rotary — single, double
- Pivot — single, double
- Wall-sliding — single, double
- Magic — single, double
- Sliding 2 panels
- Sliding 3 panels
- Sliding 4 panels
Technical door:
- Single
- Double
- Swinging single
- Swinging double
Openings:
- Opening — suitable for marking small openings in the wall: pipes, ventilation, etc.
- Door opening — a simple opening in the wall.
- Doorway — openings of various shapes with frames, casing or jambs.
Door tag
3. COMMON ELEMENTS
Common elements - elements that are repeated in each family.
Handing
Door handing parameters are located in the type parameters.
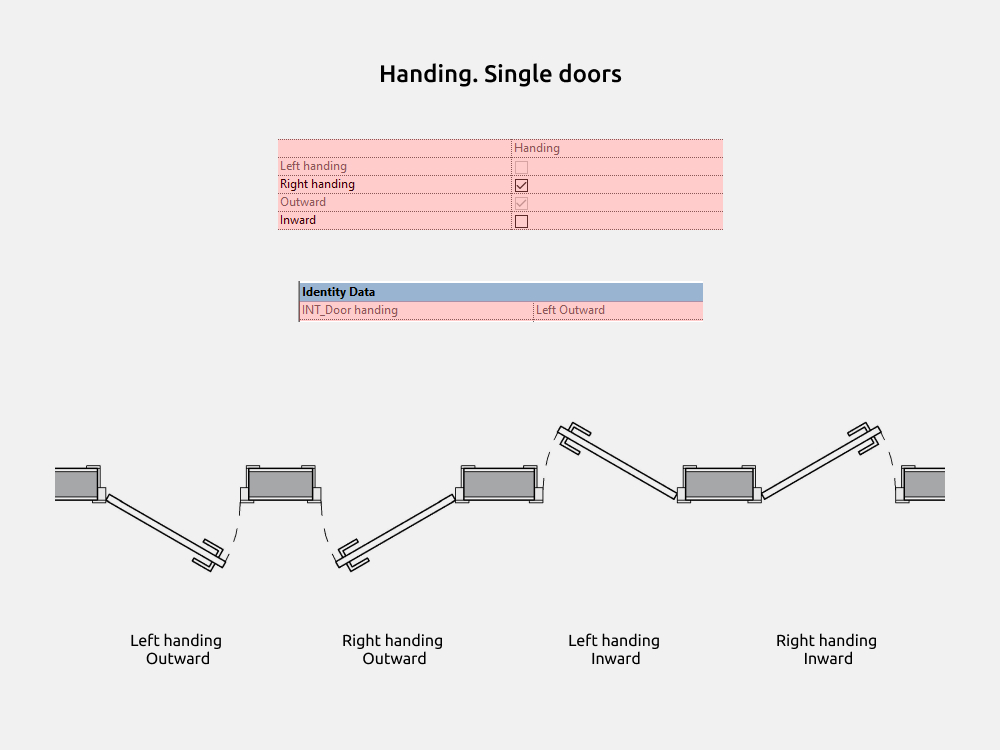
Handing types:
- Left handing
- Right handing
- Outward
- Inward
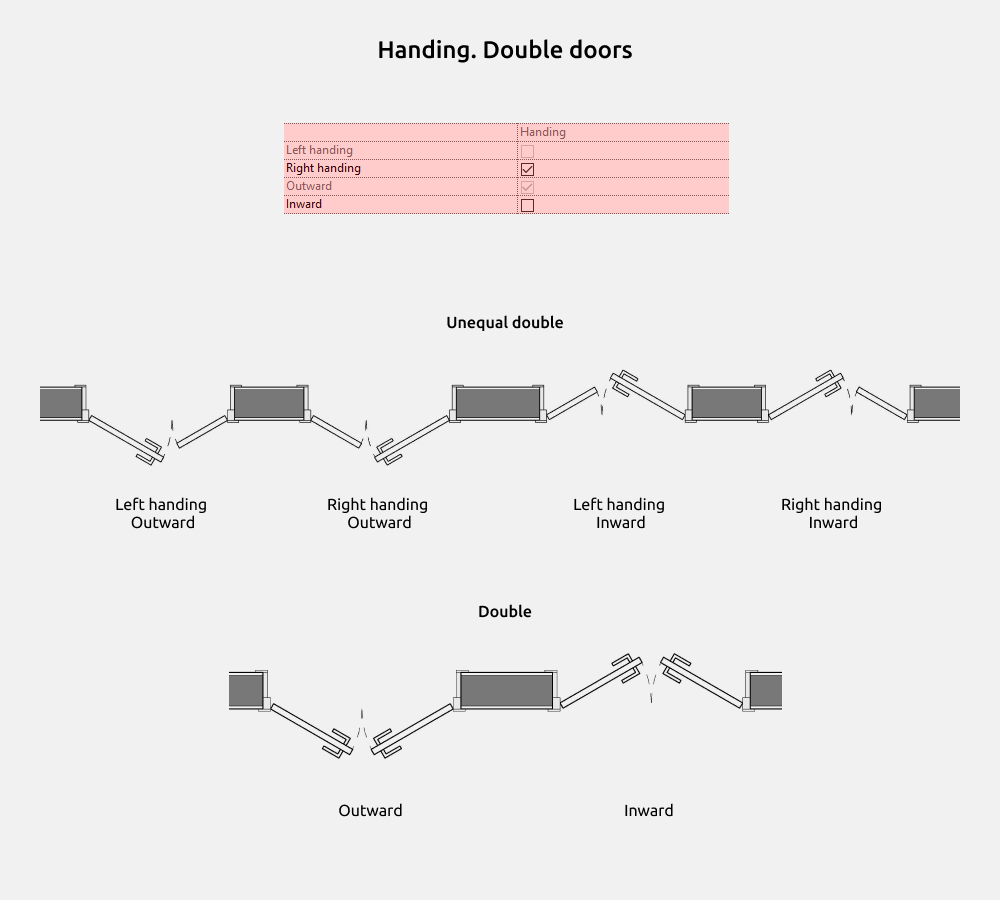
For double doors that do not have Left or Right handing (with identical doors), only the Outward or Inward options will be specified.
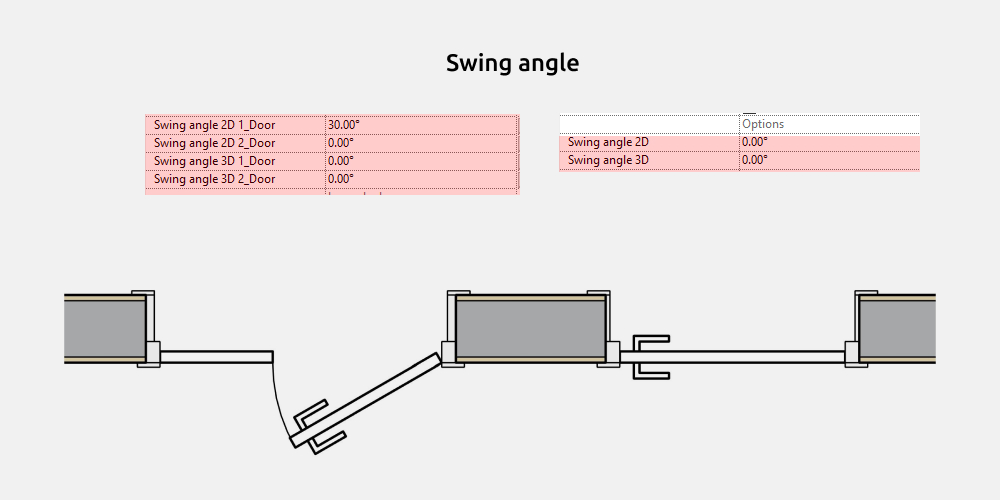
The swinging angle works for 3D and 2D doors separately, since the display on 2D is done using conditional lines.
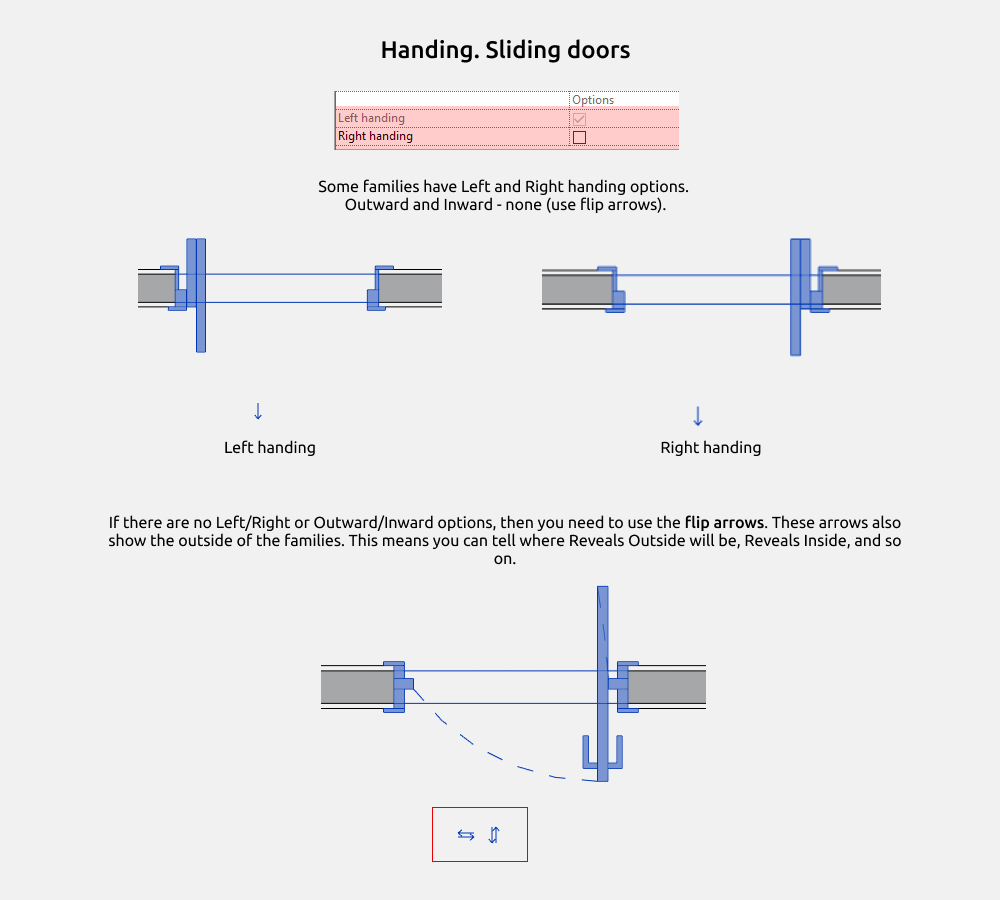
Sliding single doors have Left and Right handing options. Outward and Inward - none (use flip arrows). In double sliding doors - only arrows.
These arrows also show the outside of the families. This means you can tell where Reveals Outside will be, Reveals Inside, and so on.

To make it easier to indicate door handings in shedules, a shared parameter was created - INT_Door handing. It's located in the Identification section.
If a parameter is gray (inactive), it means that a special formula is written inside it and because of this, the parameter cannot be controlled.
If the parameter is black (active), you can enter the information yourself for a specific door configuration. This applies to almost all sliding doors.
For double doors that do not have Left or Right handing, only the Outward or Inward options will be specified.
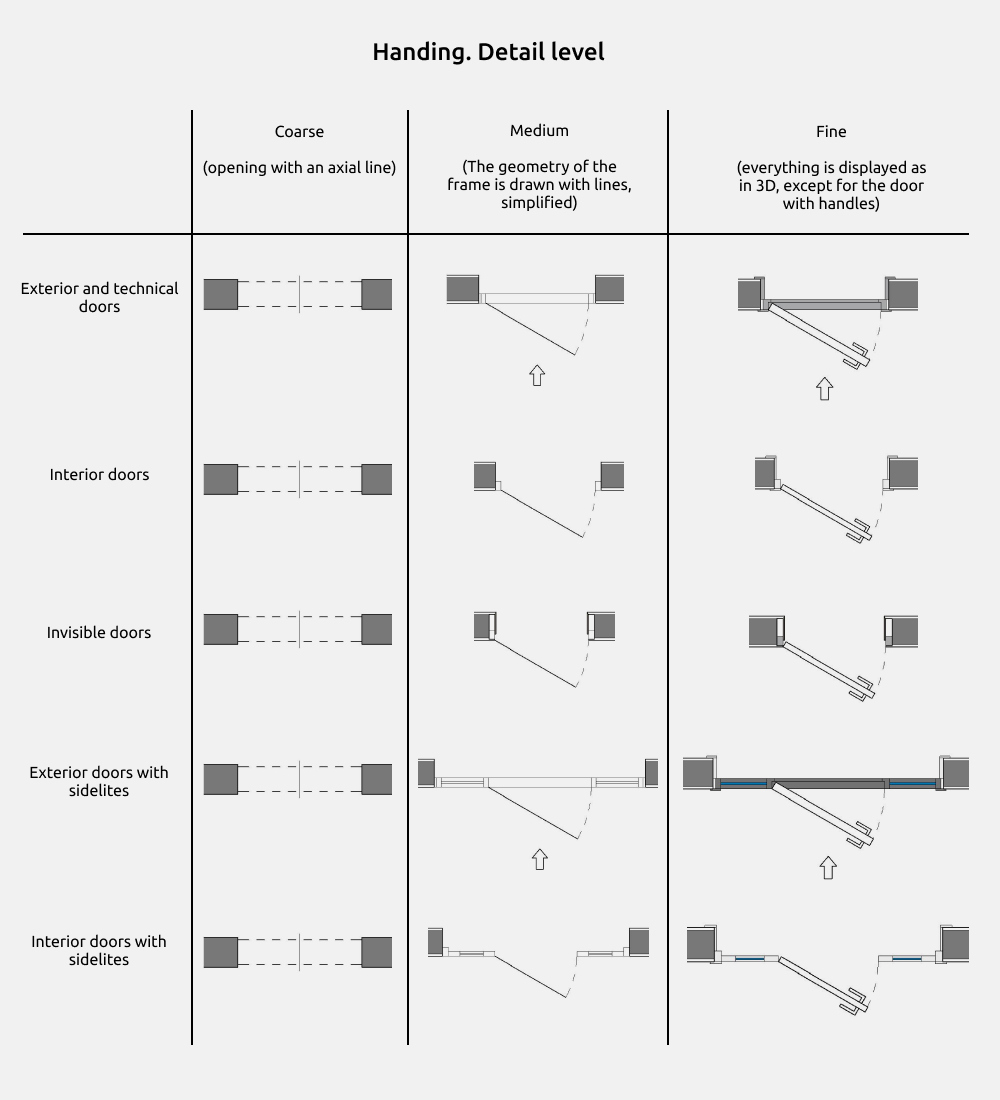
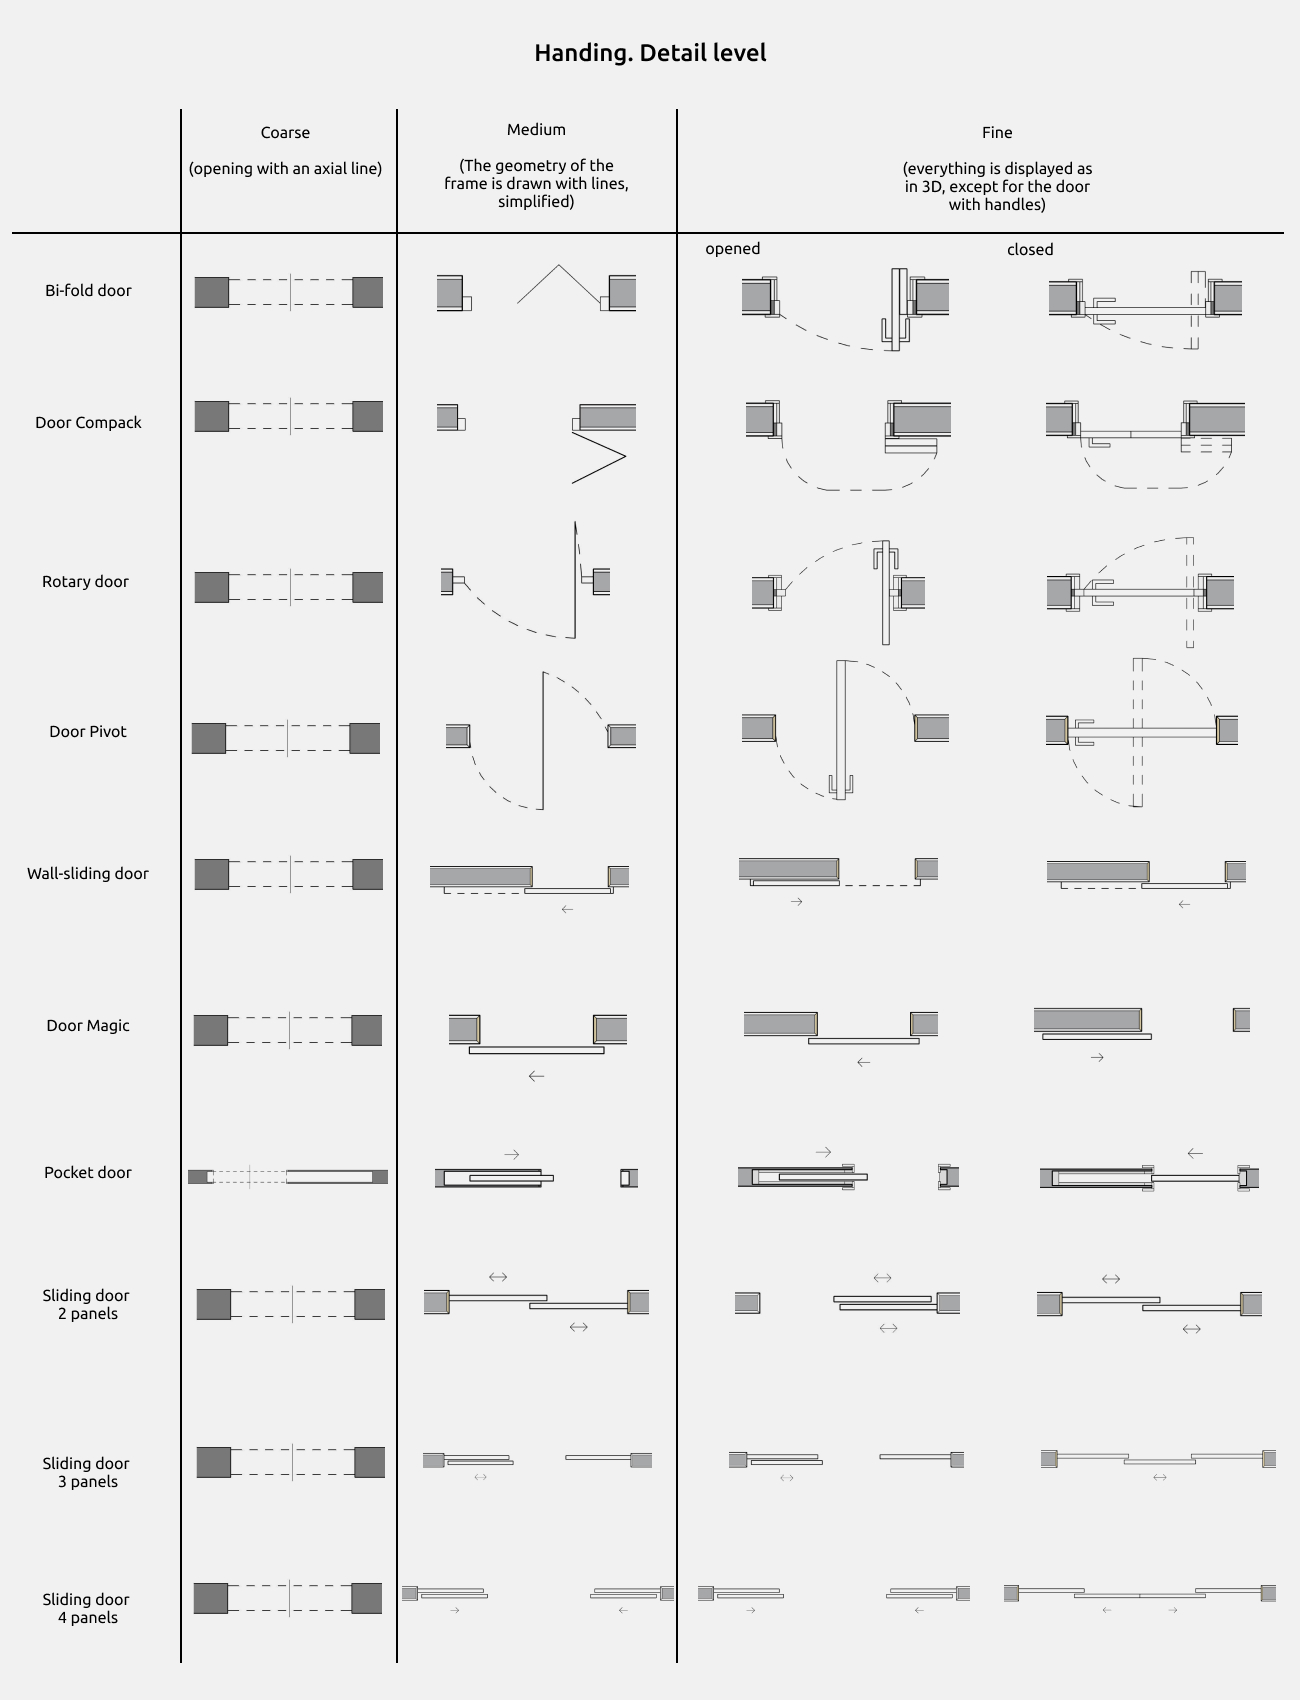
At the Fine detail level, everything is displayed as in 3D, except for the door and handles. This 2D door rotates separately from the 3D door.
At the Medium detail level, the frame geometry is drawn with simplified lines. Casing ansd jambs are hidden. The door is displayed simply as a line.
Type properties
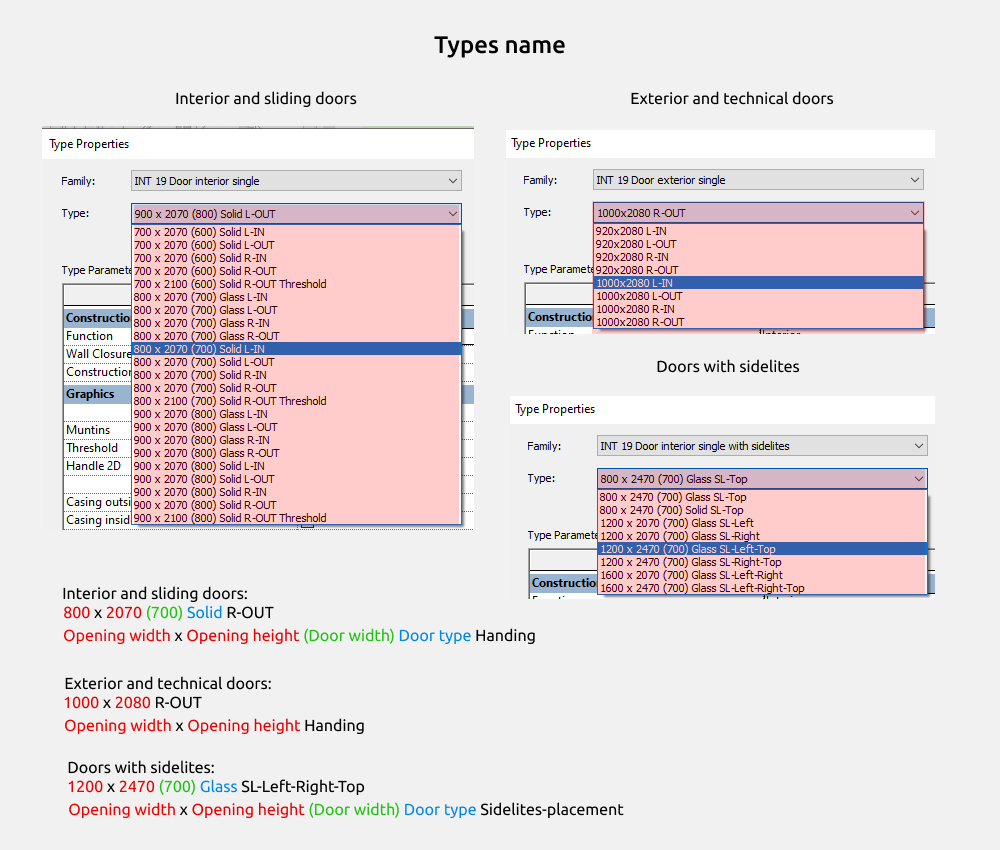
Types for all families start with the opening dimensions (opening width and opening height).
For interior and sliding doors, the following is Door width (or several doors 600+600, etc.)
Door type: Solid or Glass
Handing: R L OUT IN
Sidelites SL - placement: Left, Right, Top, Left and Right, Left and Top, Right and Top, Left Right and Top.
Hardware (Handles, locks..)
Handles
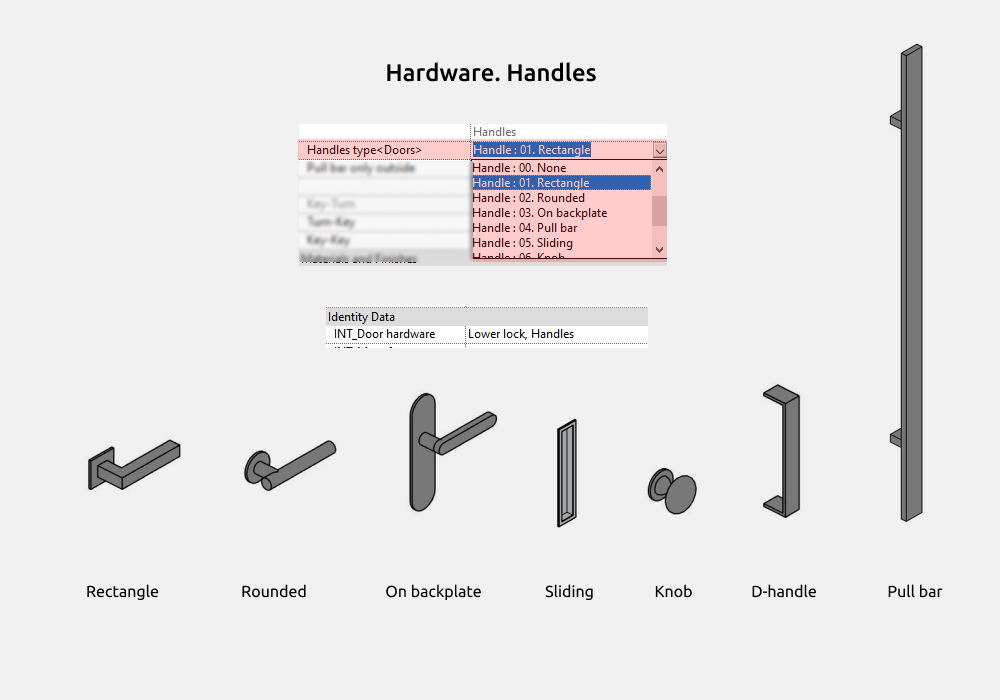
You can select handle types from the drop-down list unless these are sliding doors (in which case only sliding handles are selected by default). These are:
- None
- Rectangle
- Rounded
- On backplate
- Pull bar
- Sliding
- Knob
- D-handle
To identify all door hardware in the shedules, a common parameter, INT_Door hardware, was created. It is located in the Identification section.
You must fill in the information yourself for a specific door assembly.
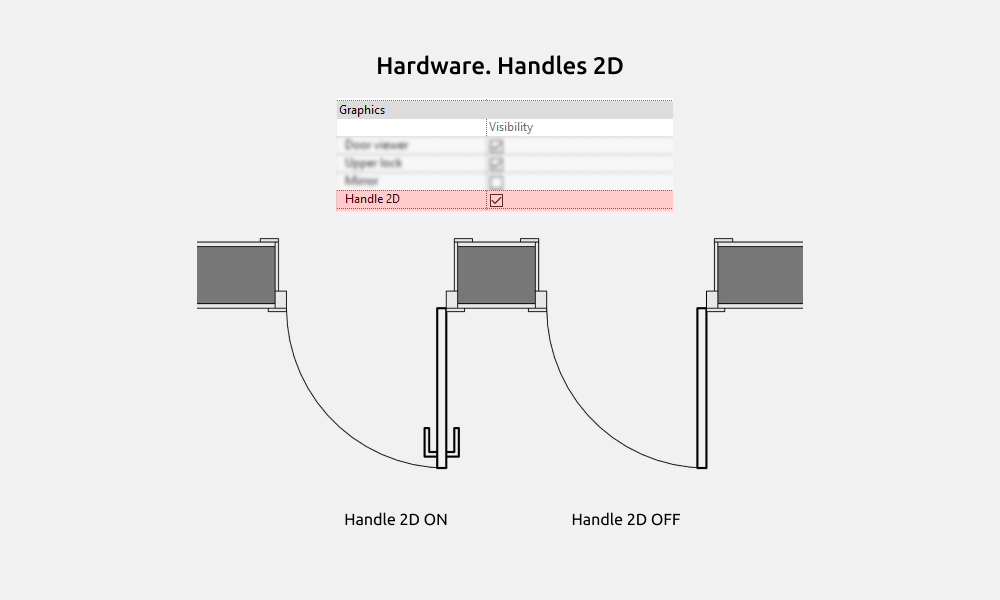
The handle on 2D can be turned off (for example, if the door has a sliding handle type).
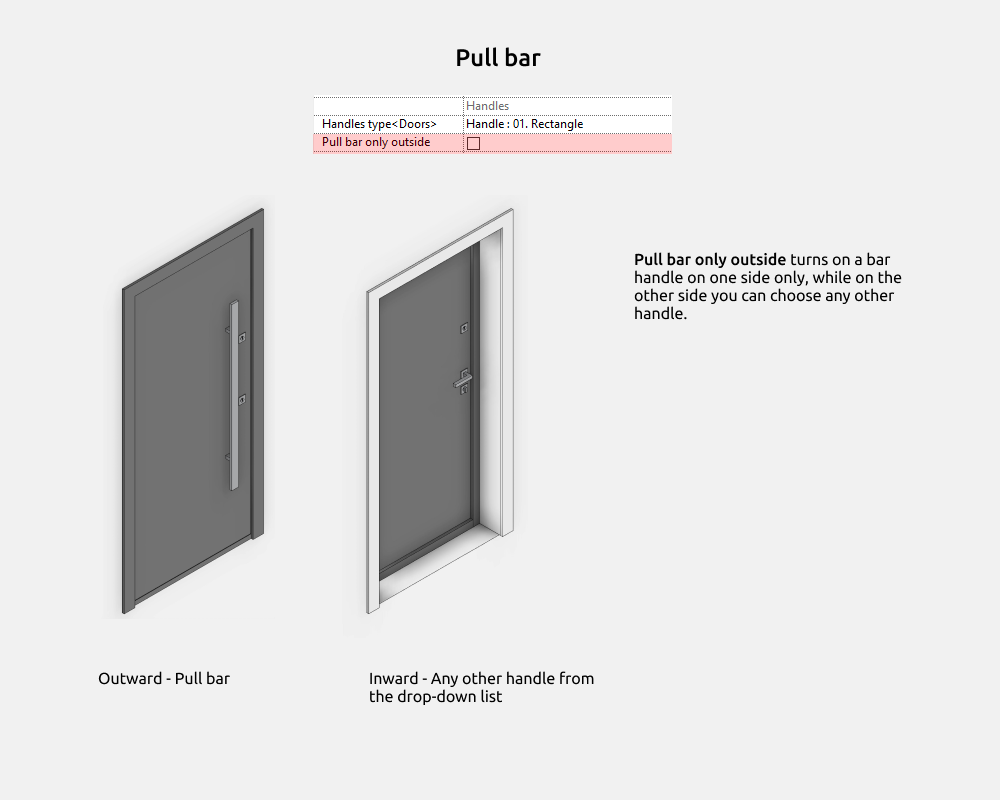
Pull bar only outside turns on a bar handle on one side only, while on the other side you can choose any other handle.
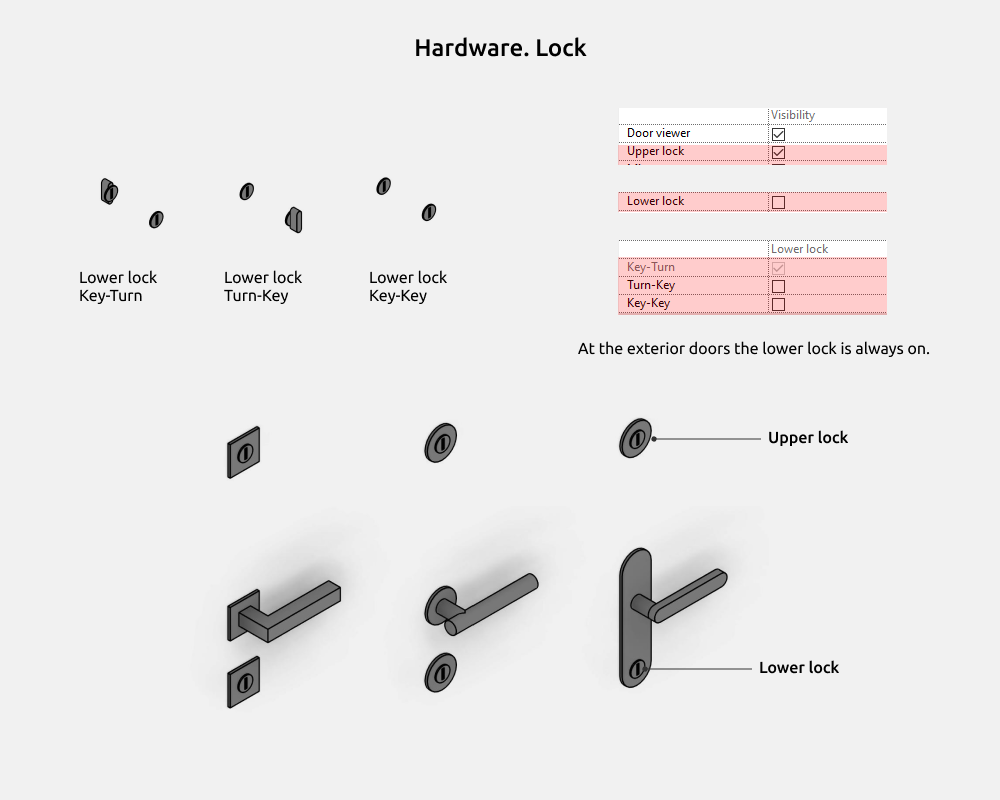
Lock types:
- Upper lock (in exterior doors)
- Lower lock (It is present in all door families, and is always on for entrance doors)
The Lower lock has additional options for placing the Turn and Key inside or outside:
- Key-Turn
- Turn-Key
- Key-Key
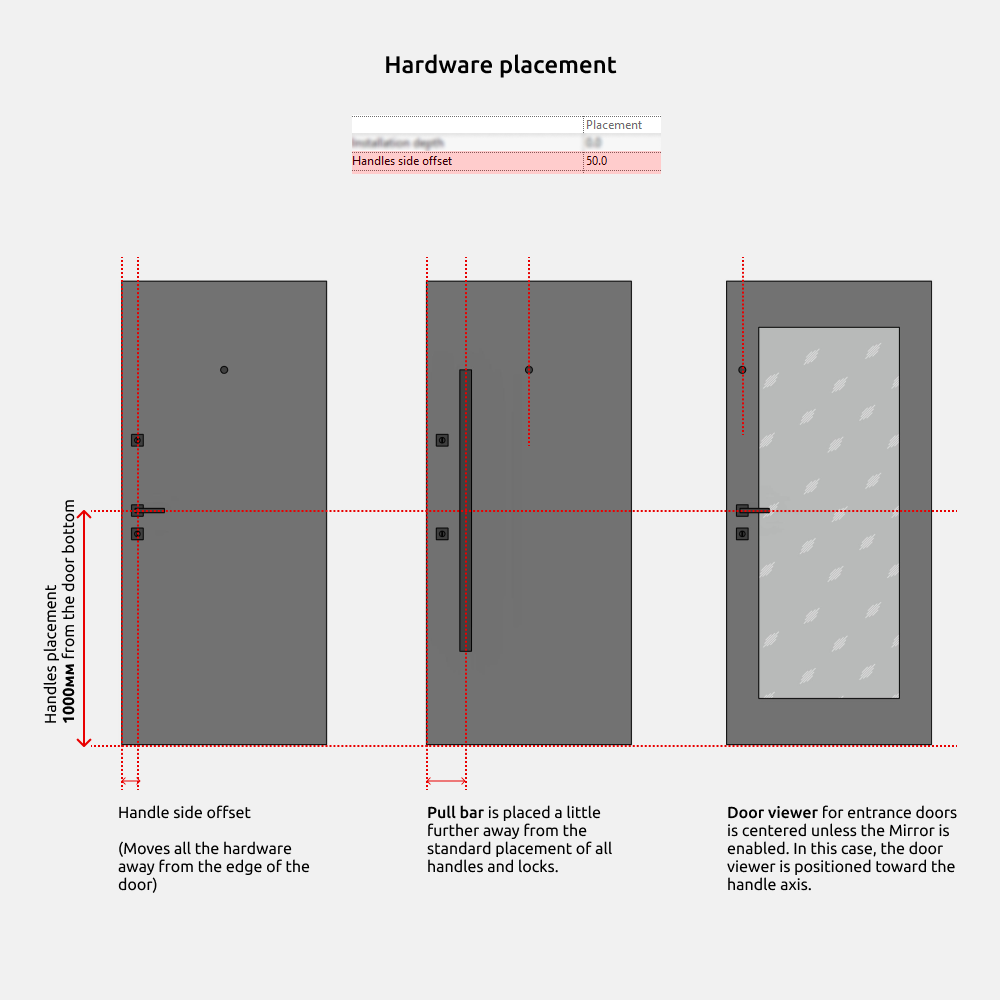
The dimensions of all hardware remain unchanged. Only the offset from the door edge to the handle's centerline can be adjusted, which is controlled by the "Handle side offset" parameter.
Pull bar is placed a little further away from the standard placement of all handles and locks.
Door viewer for entrance doors is centered unless the Mirror is enabled. In this case, the door viewer is positioned toward the handle axis.
Handles placement 1000мм from the door bottom
Finishing
If the project includes finishing with additional thin walls that are attached to the main wall, the door must be able to slide by this thickness of the finishing and fit within the dimensions.
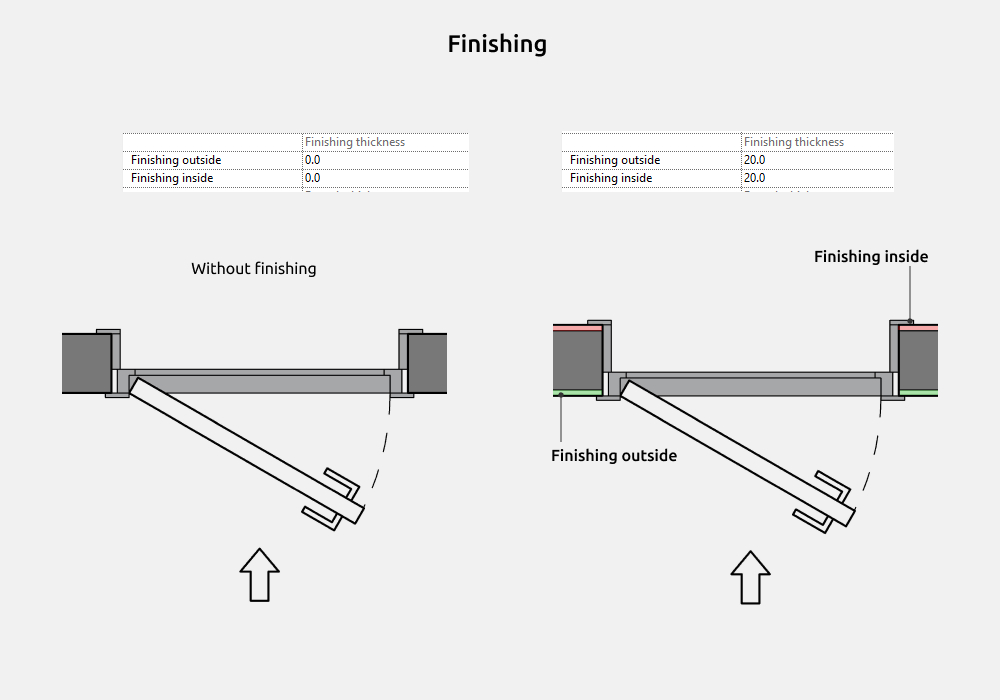
The finishing can be either on the outside or inside of the wall. To remove the finishing, you need set the Finishing thickness parameter to 0.
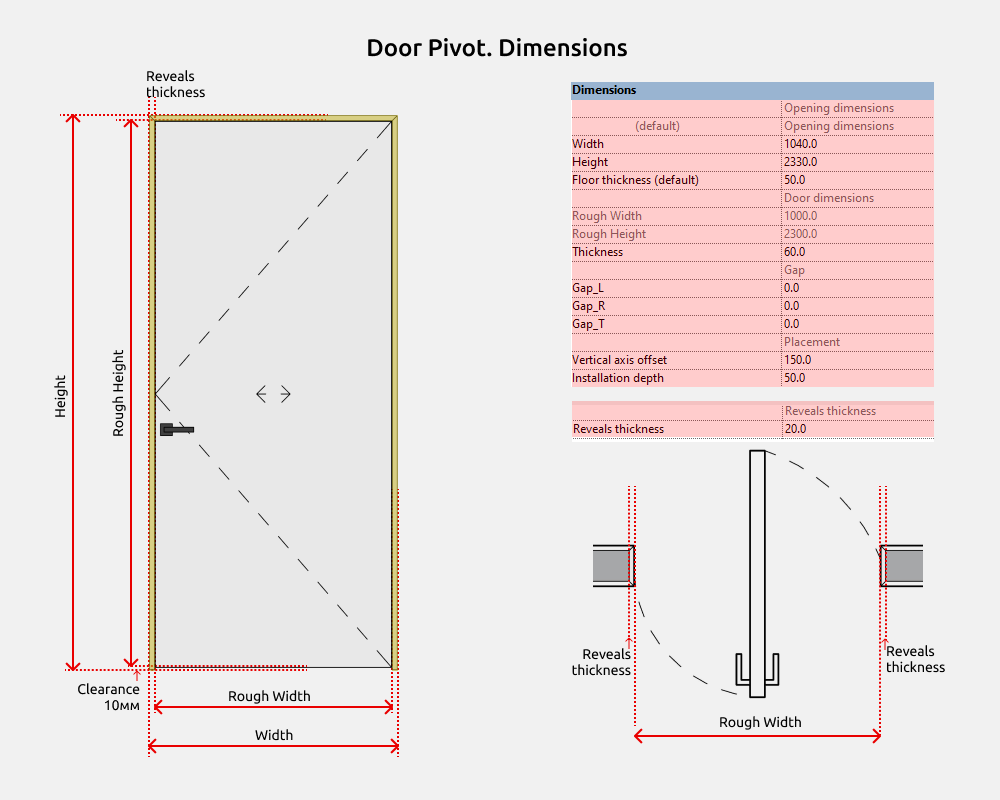
Reveals
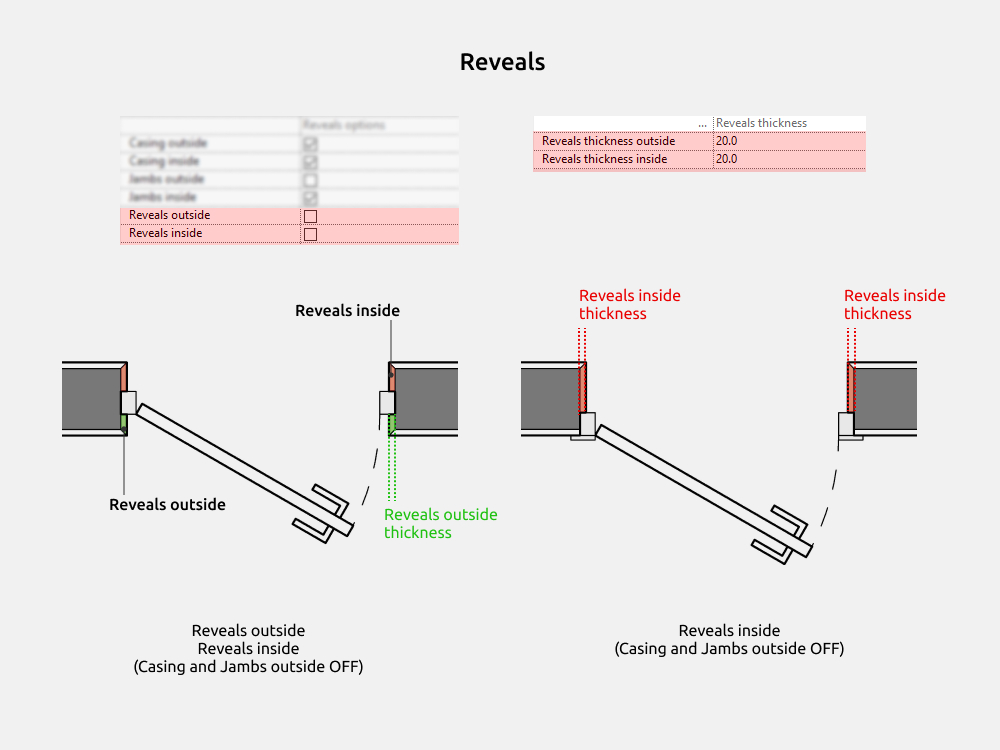
The Reveals are made in all door families by common nested families INT 19 Door reveals outside and INT 19 Door reveals inside. They are located in the Walls category. They can be enabled or disabled by clicking Reveals inside or Reveals outside parameters.
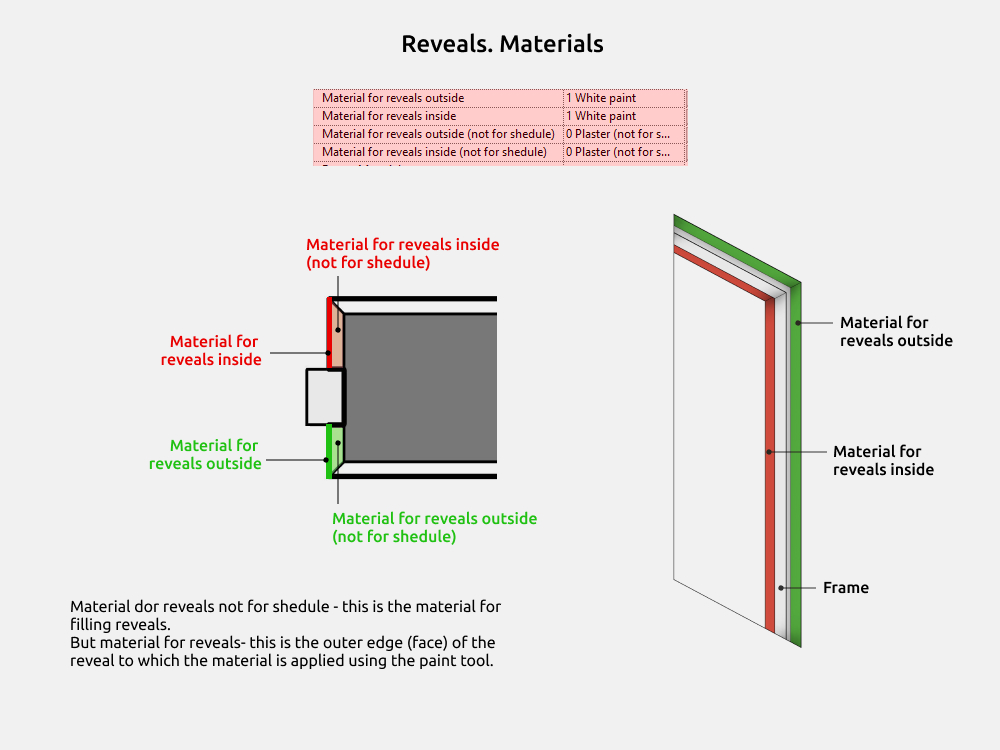
To ensure that the reveals area is calculated based on the outer edges, rather than the entire volume (which would produce incorrect data for the shedule), a division by materials has been made.
Material for reveals not for shedule - this is the material for filling reveals.
But material for reveals - this is the outer edge (face) of the reveal to which the material is applied using the paint tool. The material can be used to calculate the area.
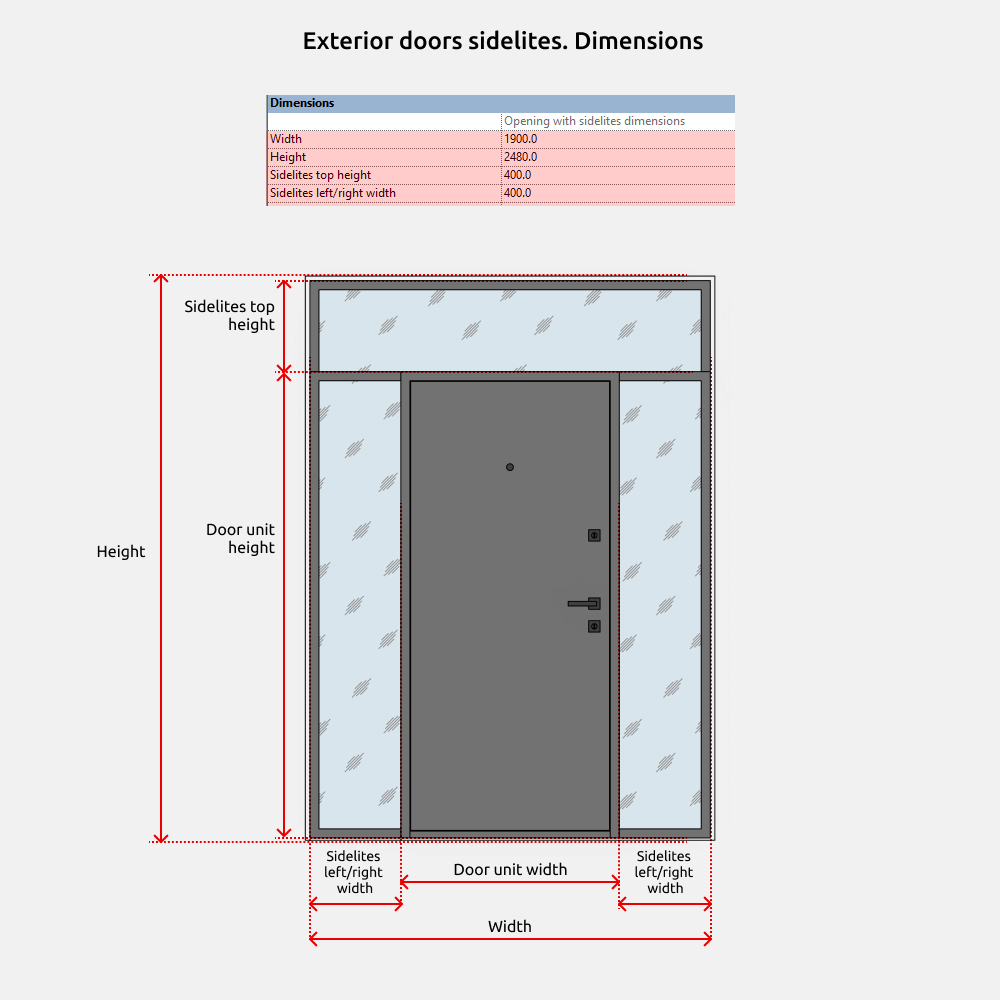
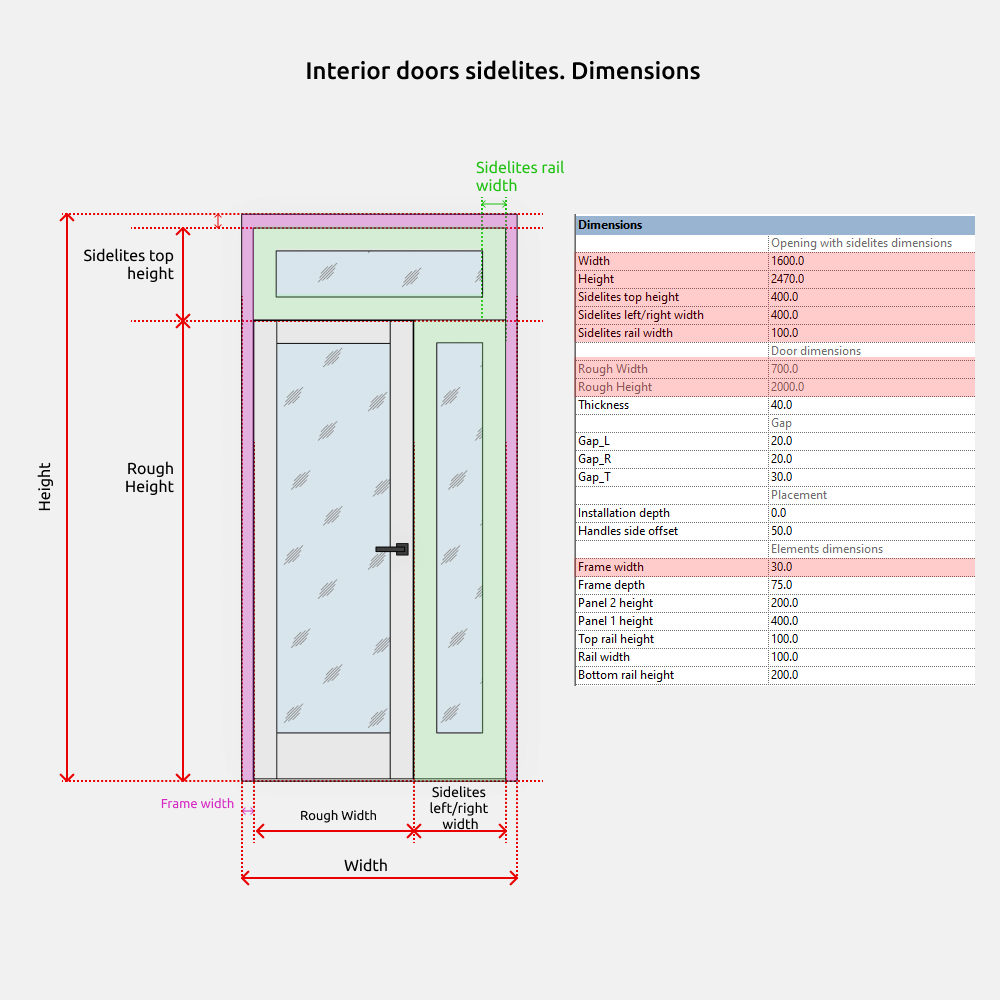
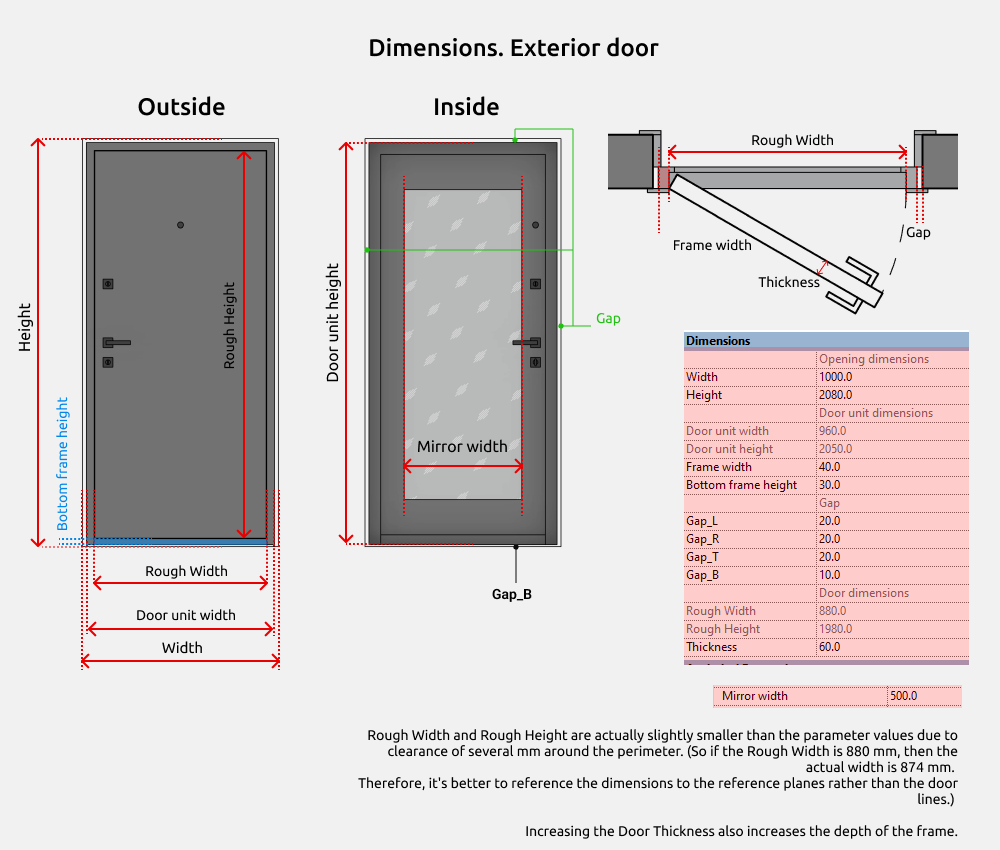
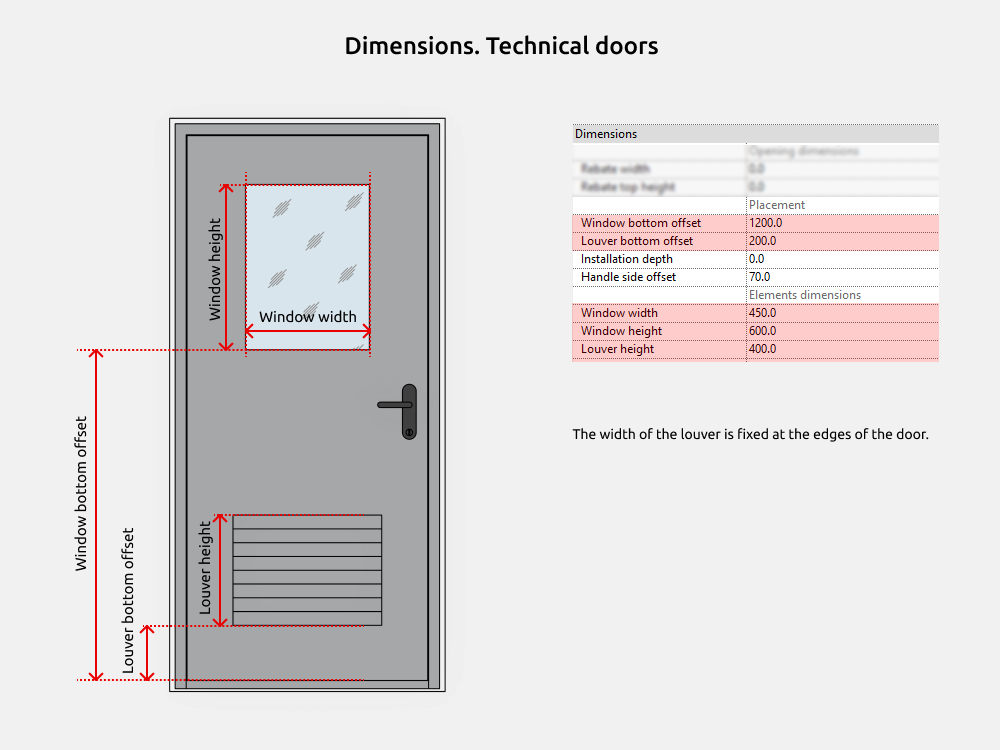
Dimensions
Width and Height - these are the dimensions of the opening.
Rough width and Rough height, Thickness - these are the dimensions of the door panel.
Rebate
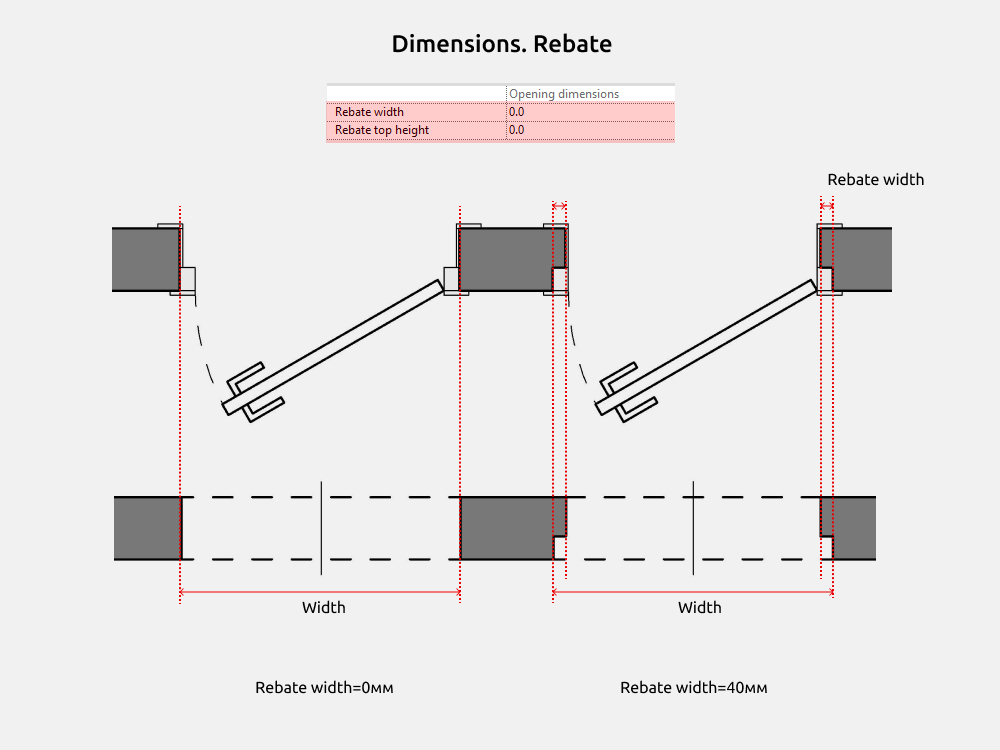
A rebate is a cutout in the opening for frame. The default value is 0.
Installation depth
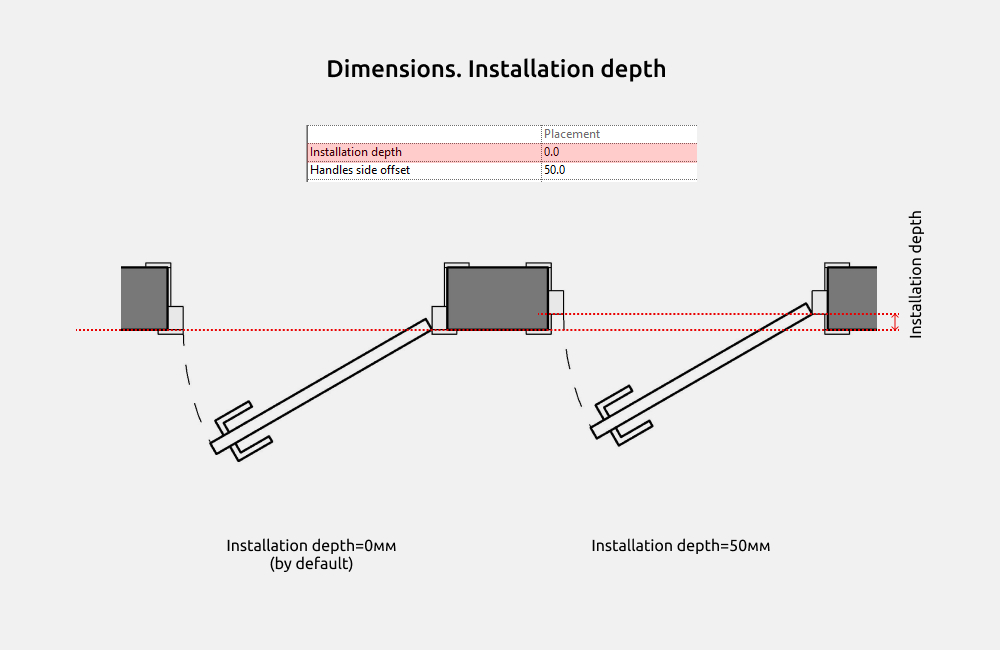
Installation depth – the depth of the door with frame offset into the opening. The default value is 0.
Casing and jambs
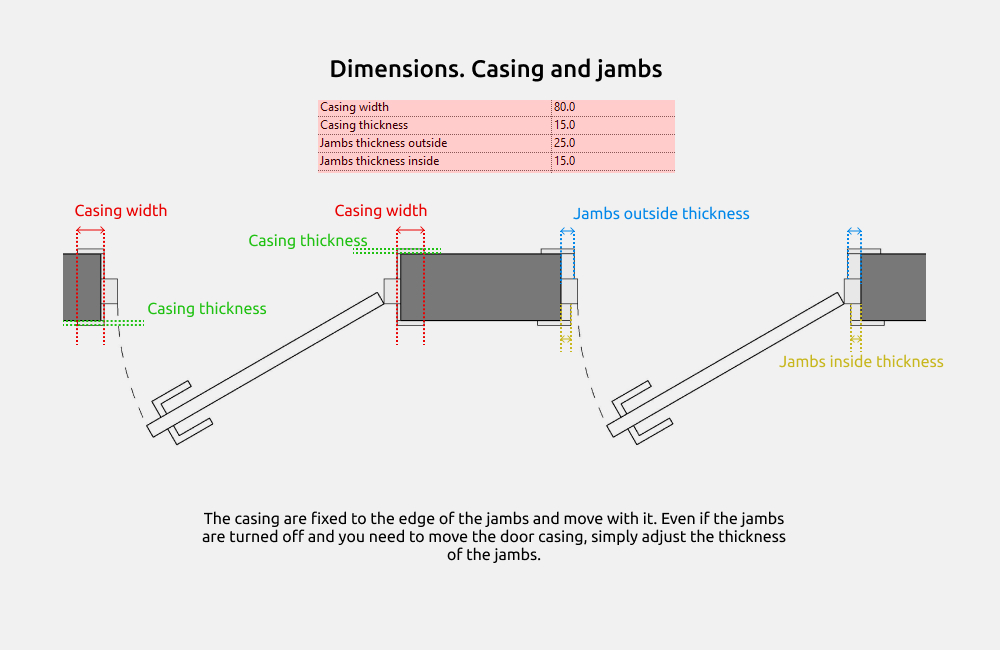
The casing are fixed to the edge of the jambs and move with it. Even if the jambs are turned off and you need to move the door casing, simply adjust the thickness of the jambs.
False transom
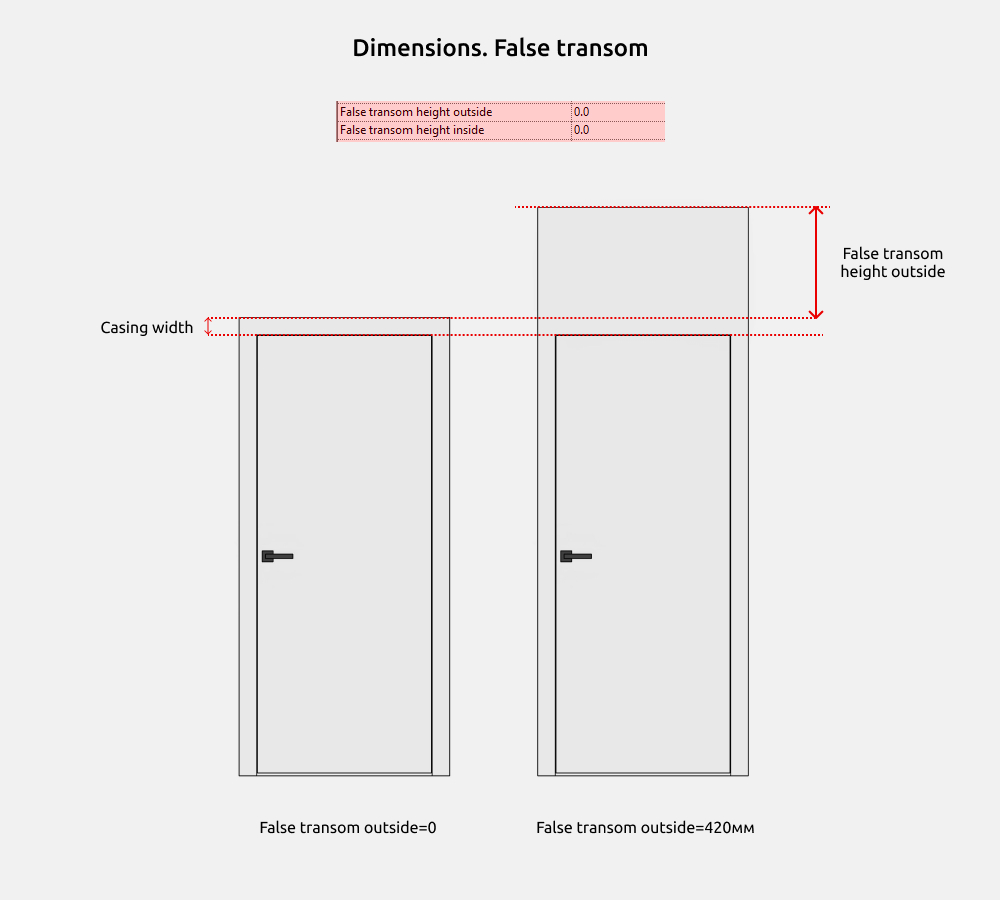
The false transom can be enabled in this family by setting the "False transom height outside" and "False transom height inside" parameters to values greater than 0. Then, one of these values will be added to the "Casing width" value, increasing the height of the casing.
If casing is disabled, the false transom will not function.
Sidelites (Transom)
Sidelites (or transoms) is used in the following families:
- INT 19 Door exterior single with sidelites
- INT 19 Door exterior double with sidelites
- INT 19 Door interior single with sidelites
- INT 19 Door interior double with sidelites
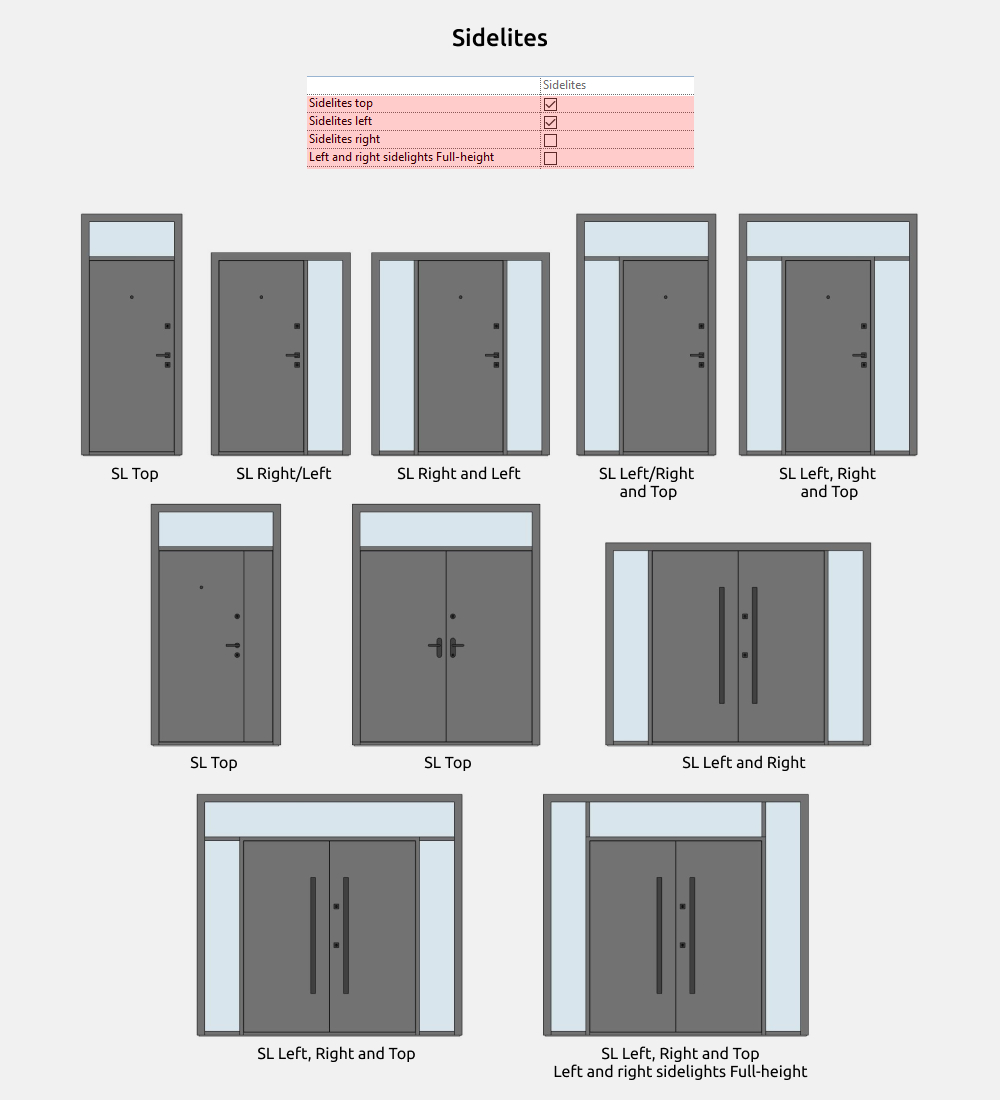
Sidelites can be placed:
- Top
- Right
- Left
- Right and Left
- Right and Top
- Left and Top
- Left, Right and Top
The Left and right sidelights Full-height parameter moves the side transoms up.
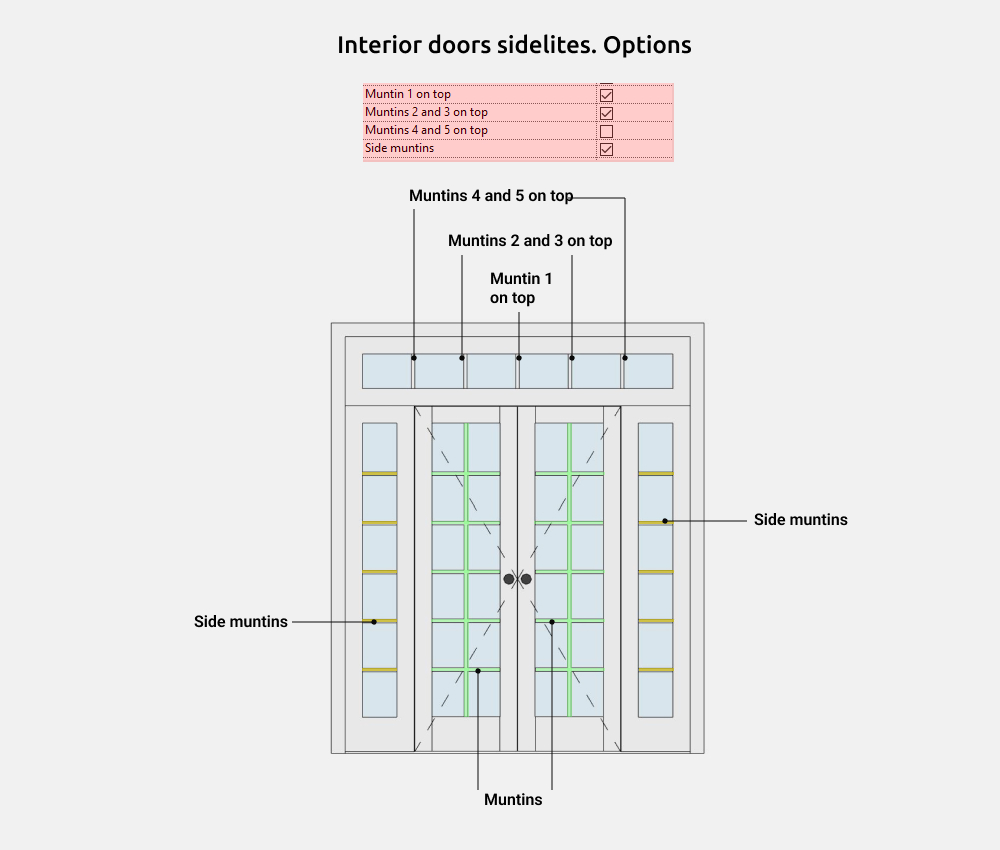
Muntins - these are elements of the door.
And additional muntins (Muntin 1 on top, 2 and 3 on top, 4 and 5 on top, Side muntins) - these are muntins that are included in the sidelites.
4. FAMILIES
Interior doors
Interior door families are doors that connect rooms within a space. The door opens in a standard way.
Interior doors are divided into:
- Single (single/with one panel)
- Double (with two panels)
- With sidelites (transom)
- Invisible
In the family you can on/off the following elements:
- Lower lock
- 2D coarse detail level
- Axis 2D
- Muntins
- Threshold
- Casing inside
- Jambs outside
- Jambs inside
- Reveals outside
- Reveals inside
- Panels count (from 0 to 3)
- Rail classic
- Bead
- Coplanar casing
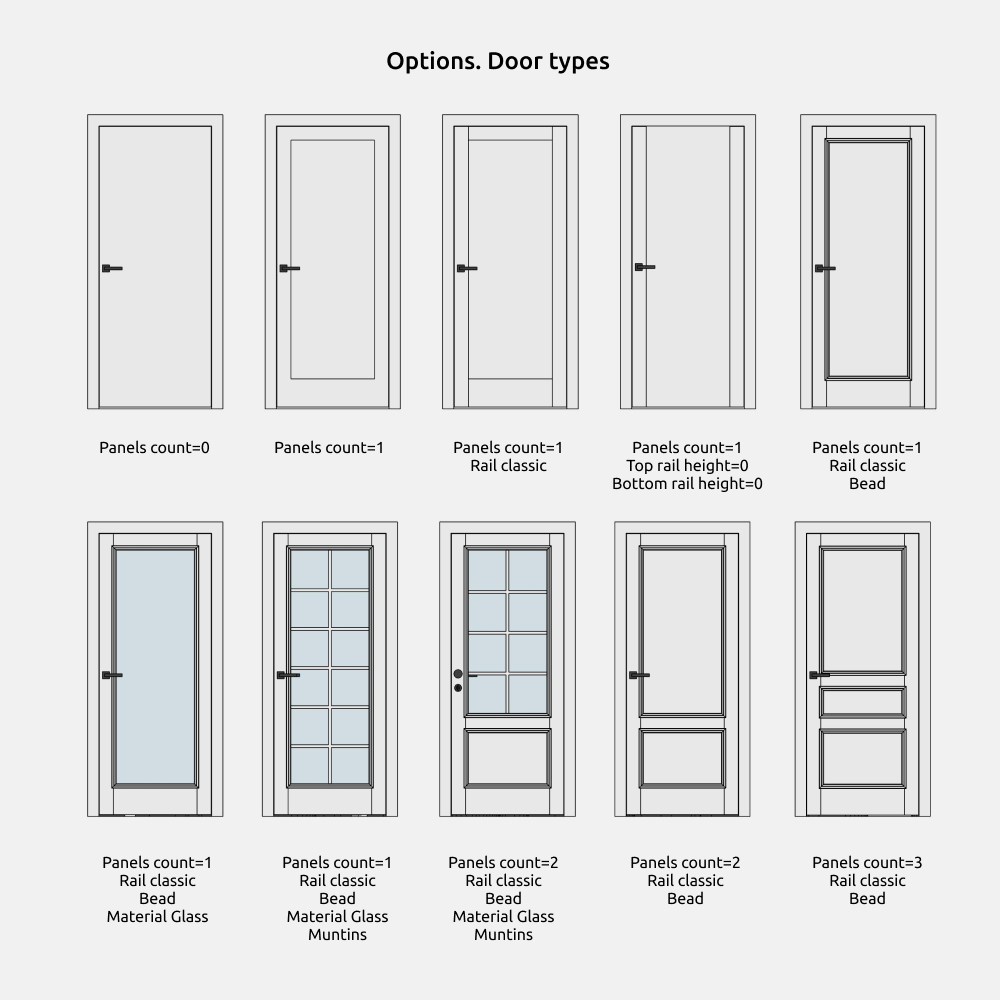
These door types are suitable for all interior doors (except invisible doors) and sliding doors.
Additional door options allow you make simple, non-milled door, as well as classic solid and glass doors.
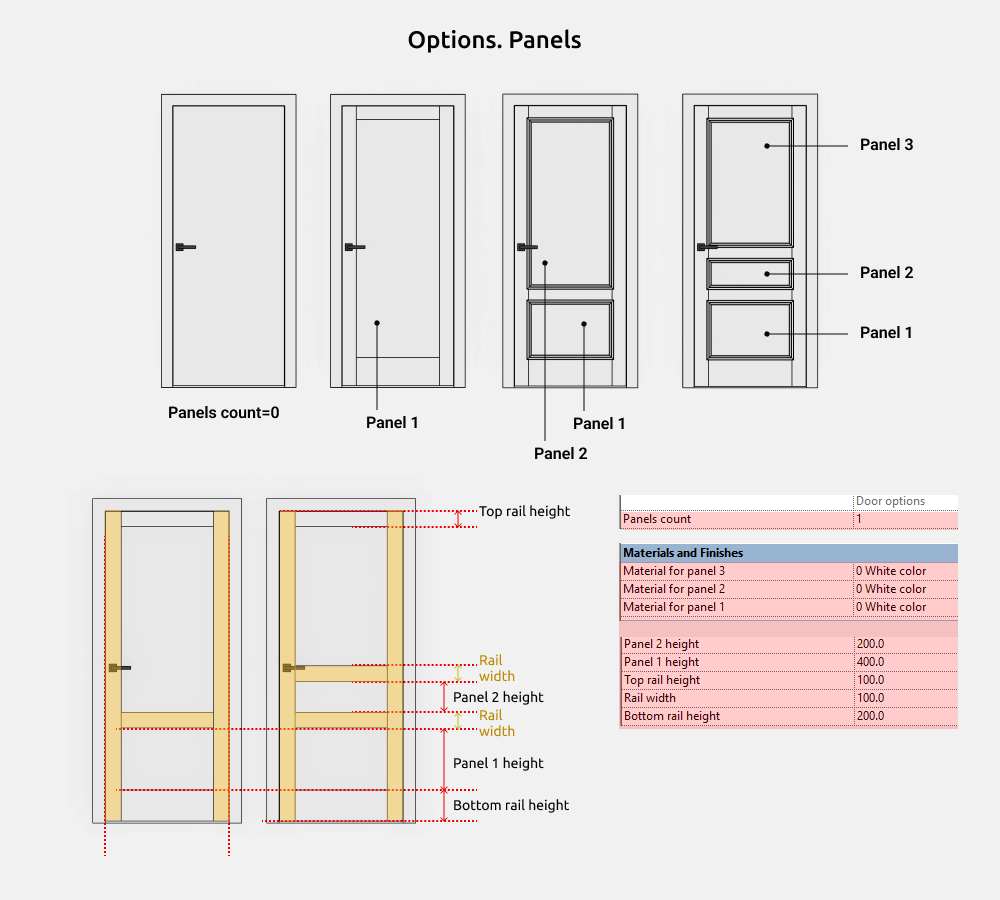
The number of panels can be from 0 to 3. If the value is 0, there will be a simple door without cutouts.

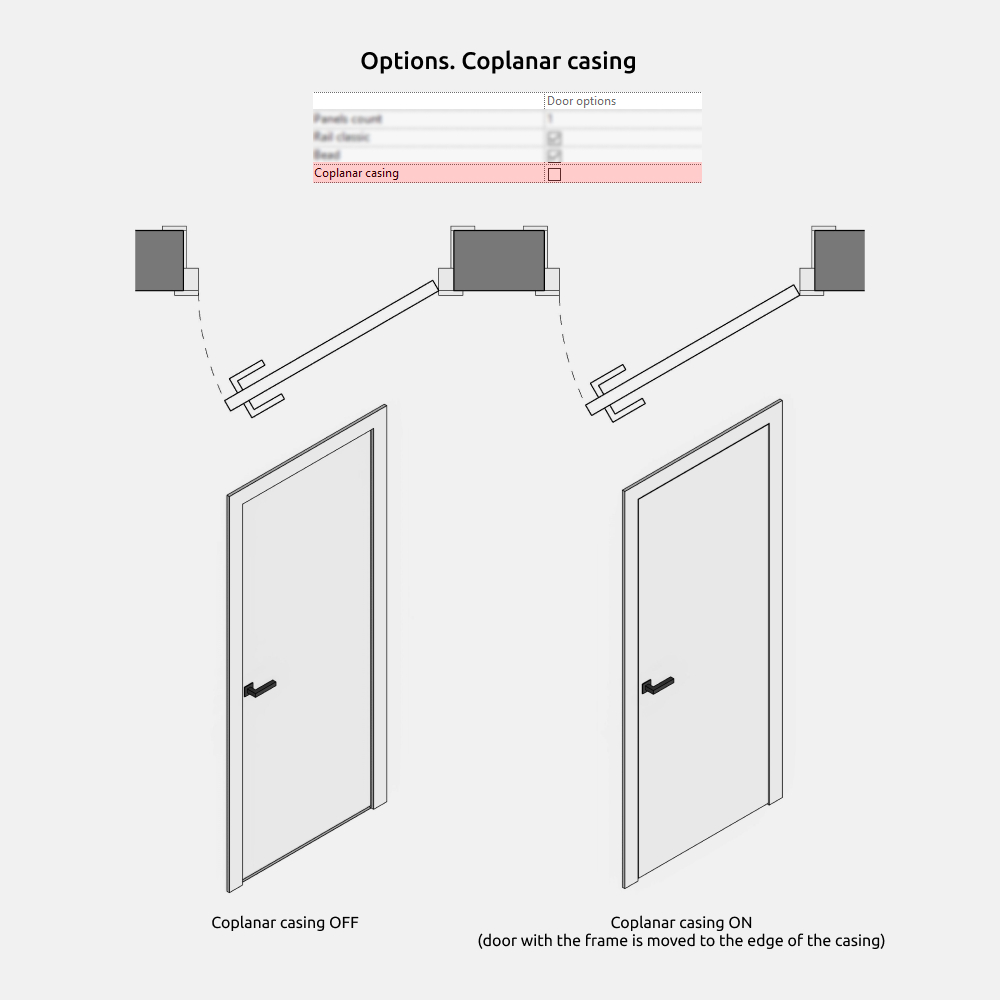
The Coplanar casing parameter shifts the door and frame toward the edge of the casing so they are aligned.
If this parameter is enabled, the Installation depth cannot be changed.
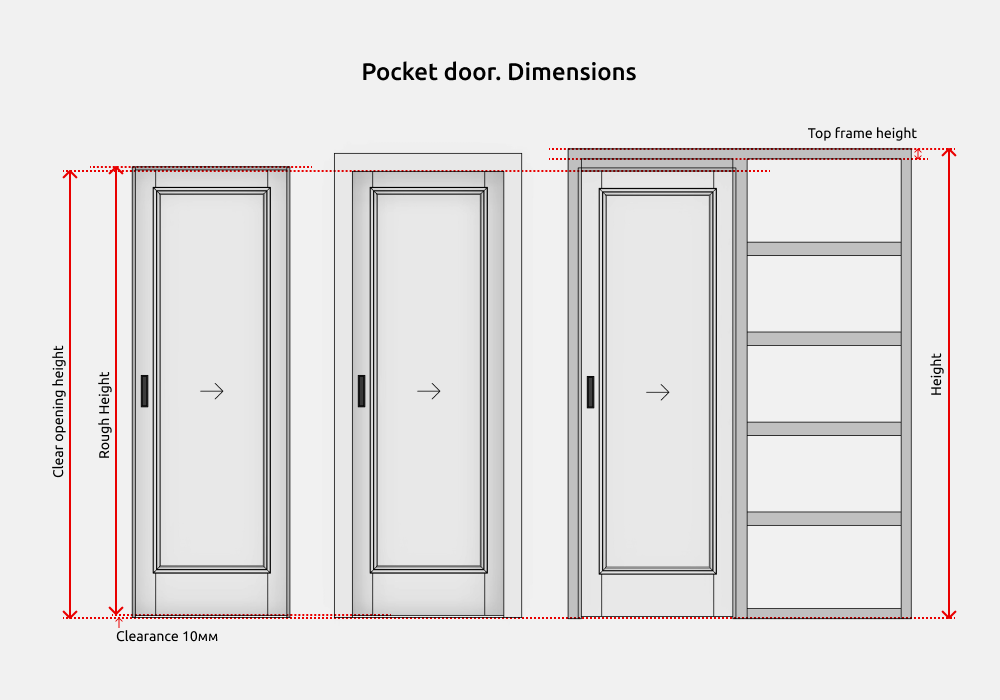
Dimensions
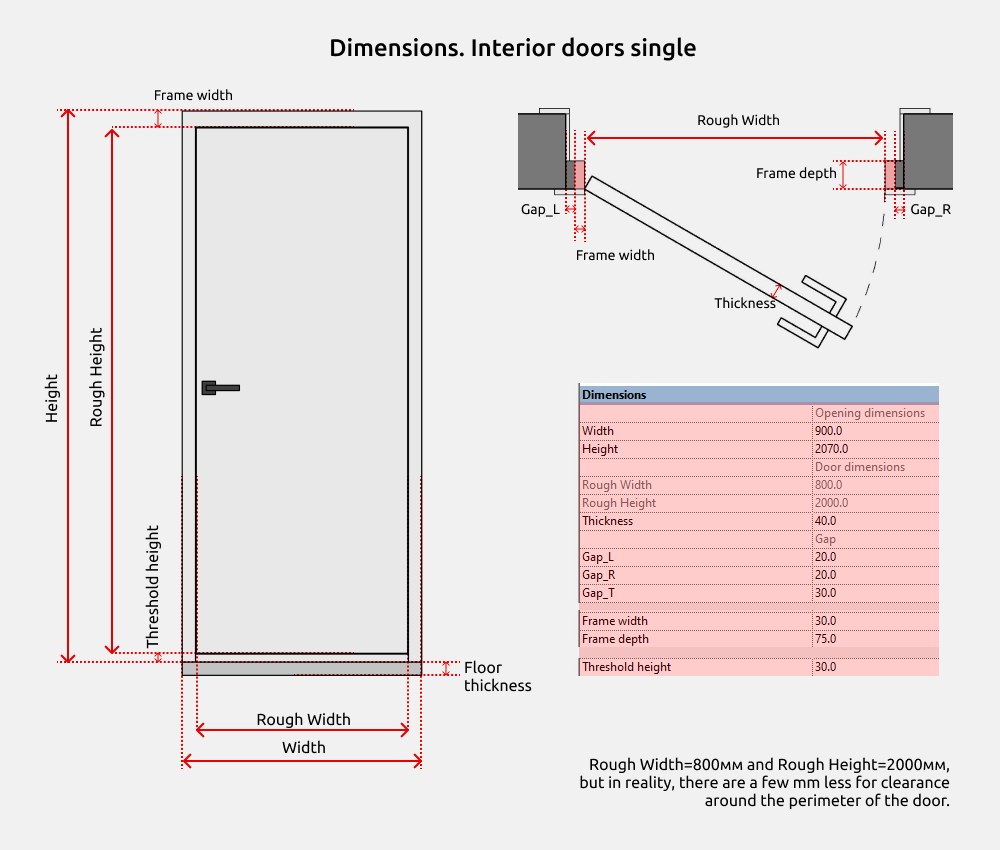
The door (panel) dimensions are slightly smaller than those in the Rough Width and Rough Height parameters due to clearnace around the door perimeter.
Rough Width = Width-Frame width*2
Rough Height = Height - Frame width - 10mm (or -Threshold height)
If the threshold is turned off, there is a gap of about 10 mm at the bottom of the door.
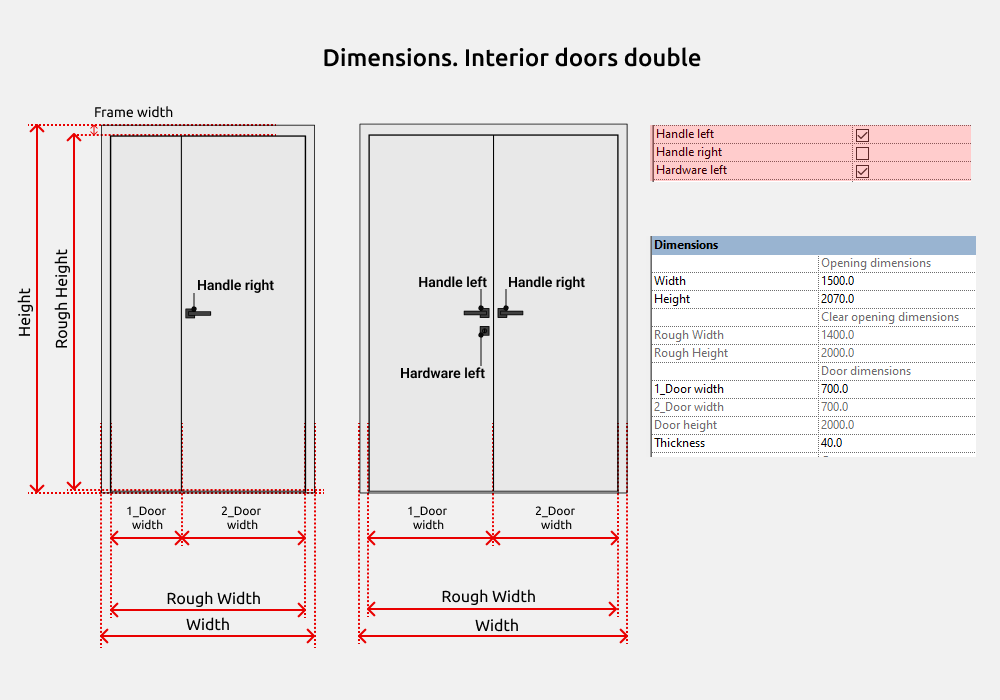
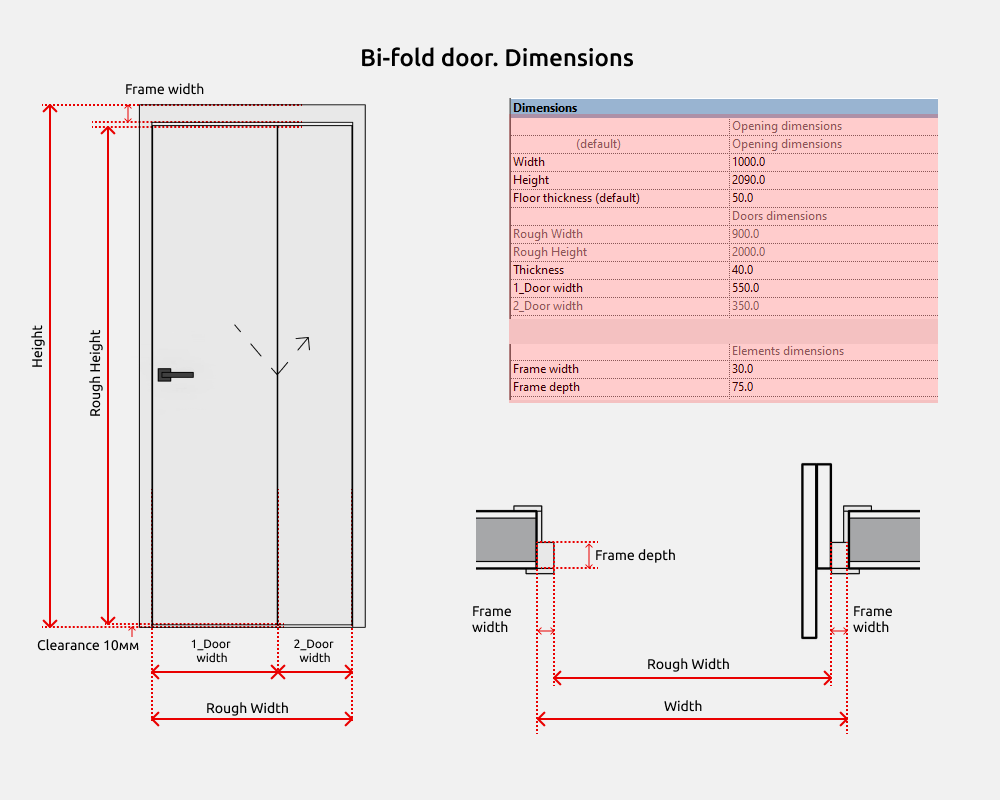
In double families there are both double doors and unequal double doors. Simply choose the right type.
Clear opening dimensions:
Rough Width = 1_Door width + 2_Door Width
Rough Height = Door height
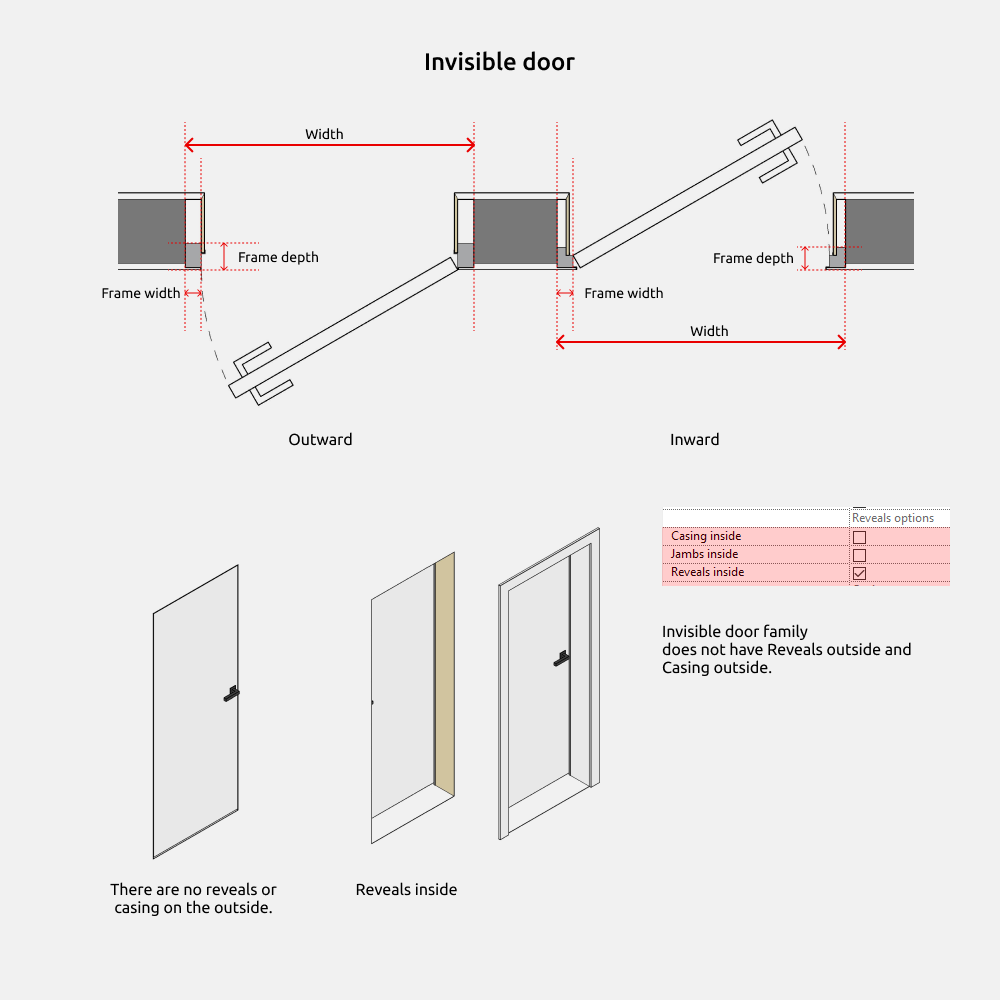
The Invisible door can also open outwards and inwards.
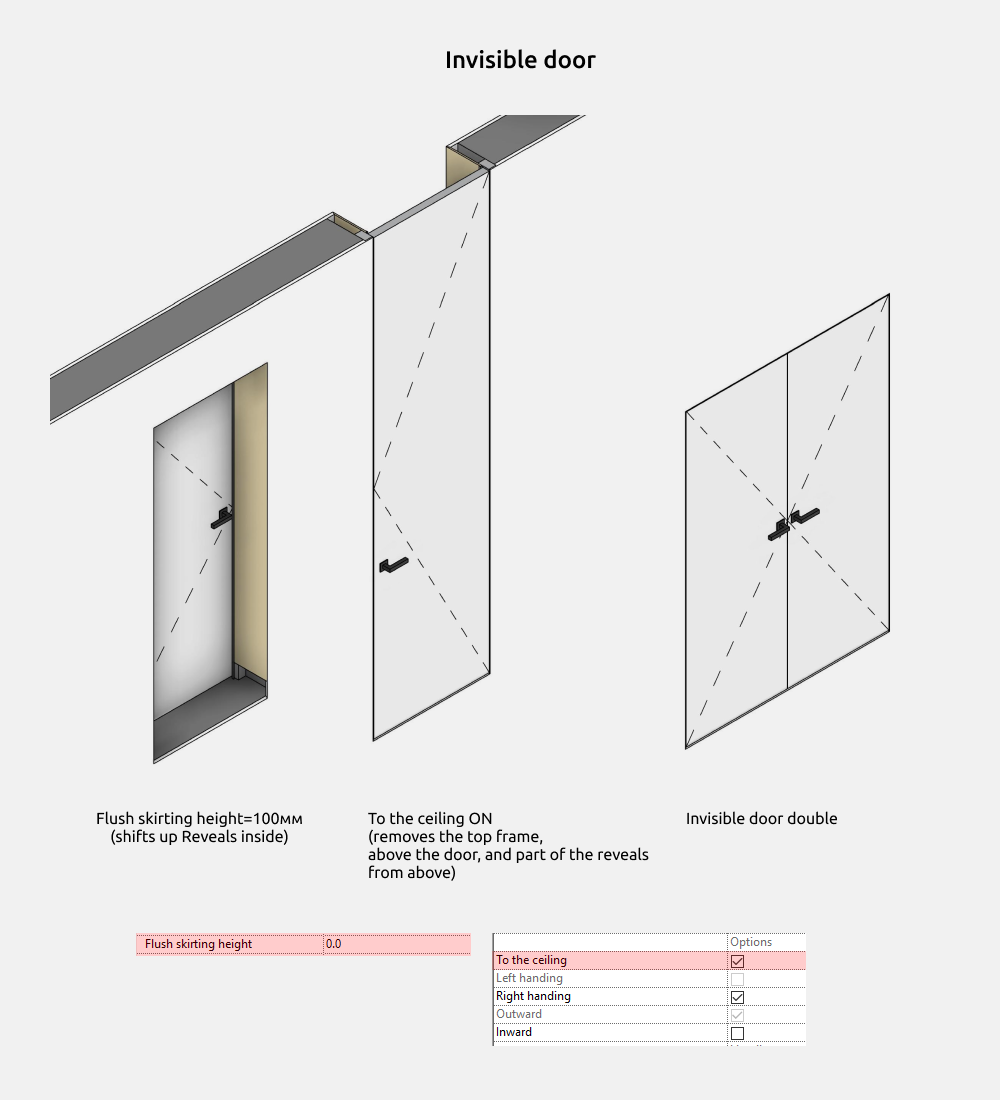
Flush skirting height option shifts the interior Reveals upward, allowing for the placement of a hidden skirting.
To the Ceiling option removes the frame above the door and part of the reveals above.
A double invisible door is also included in the set.
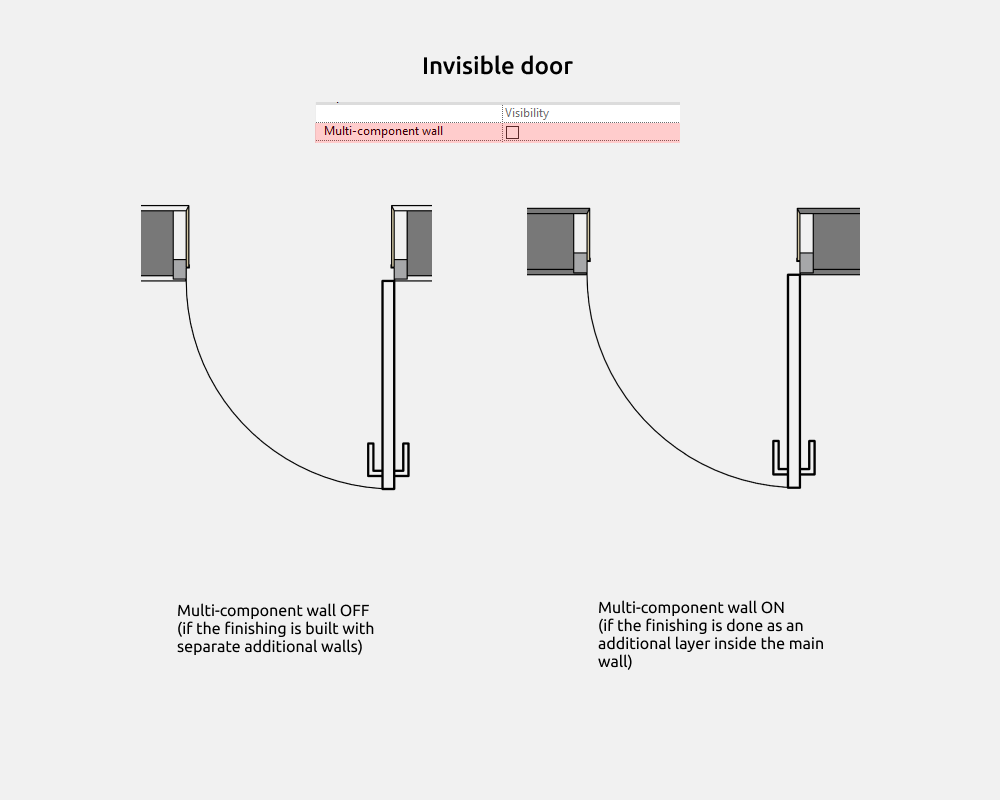
Multi-component wall option for invisible doors should be enabled when your wall finishing is done in additional layers within the main wall, rather than as separate thin walls.
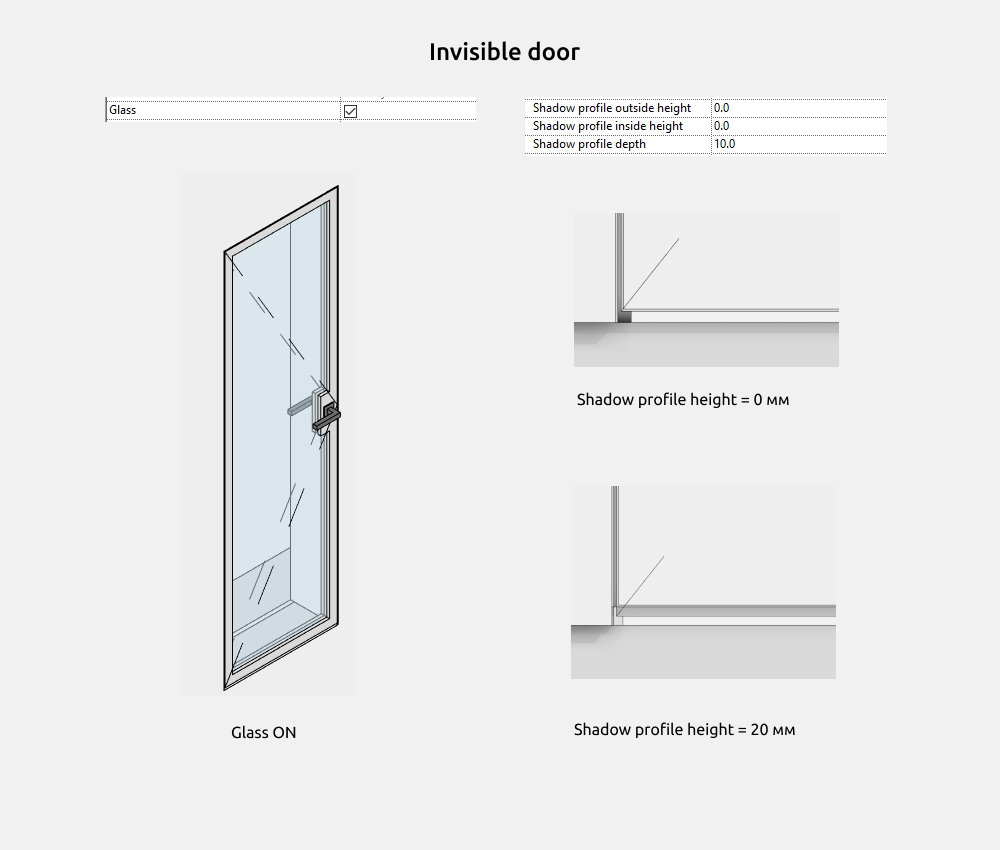
The shadow profile trim is configured in the Dimensions section. If the height is set to 0 mm, the door will look normal. Setting it to 20 mm will add a shadow profile trim.
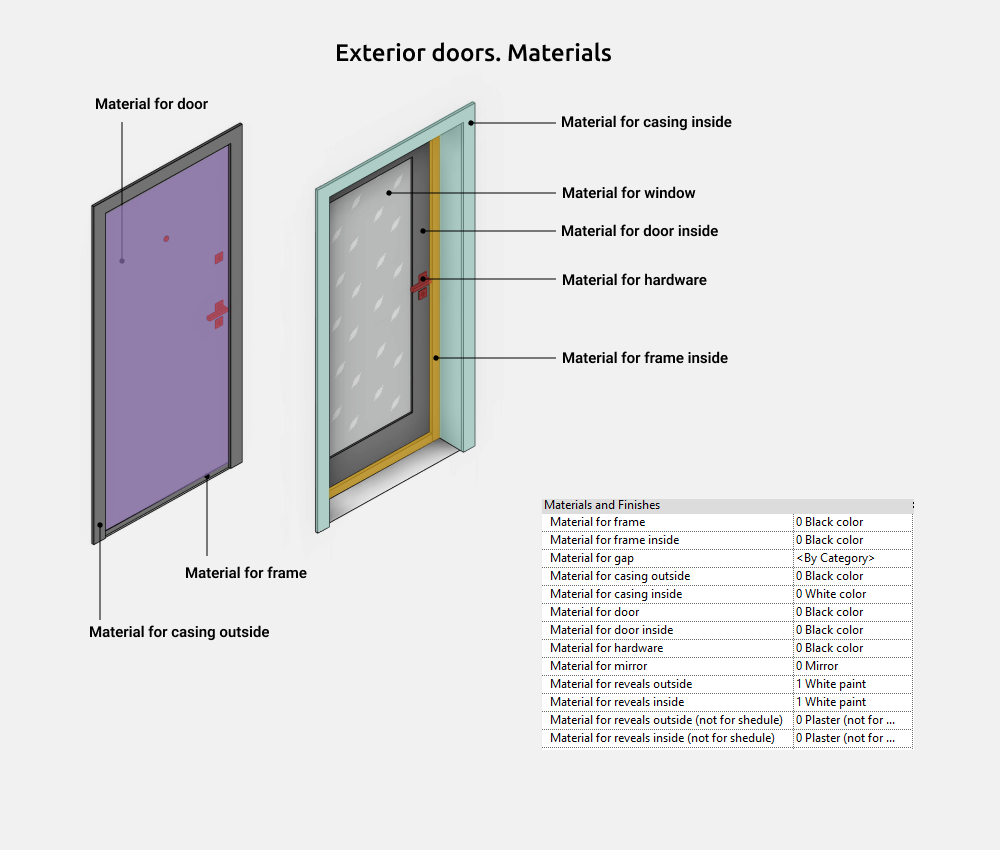
Materials
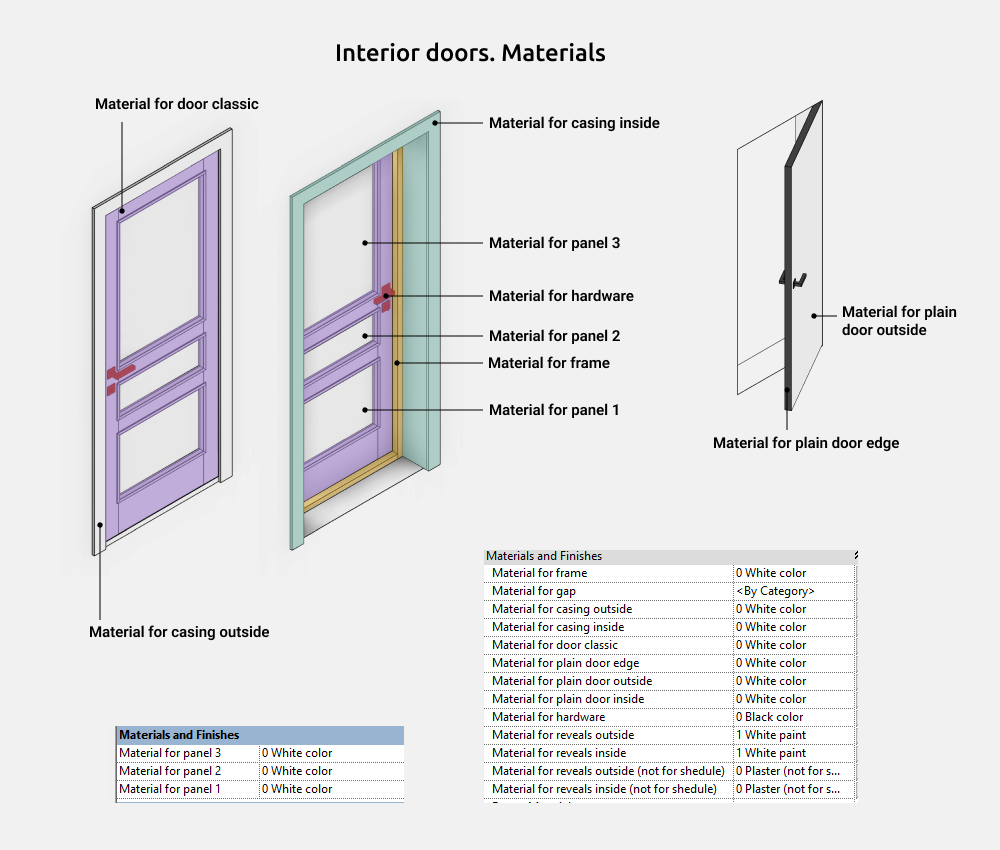
The materials of the panels are in the type.
Material for door classic are suitable for doors with panels (cutouts), while plain door materials are suitable for doors with 0 panels.
Sliding doors
Sliding door families are doors in which the panels slide/shift/rotate (unlike conventional interior doors). Sliding doors are divided into:
- Pocket — single, double
- Bi-fold — single, double
- Compack — single, double
- Rotary — single, double
- Pivot — single, double
- Wall-sliding — single, double
- Magic — single, double
- Sliding 2 panels
- Sliding 3 panels
- Sliding 4 panels
The geometry of sliding doors is the same as in interior doors. This includes the frame, casing, jambs, etc. The differences are in the sizes and additional elements.
Pocket door
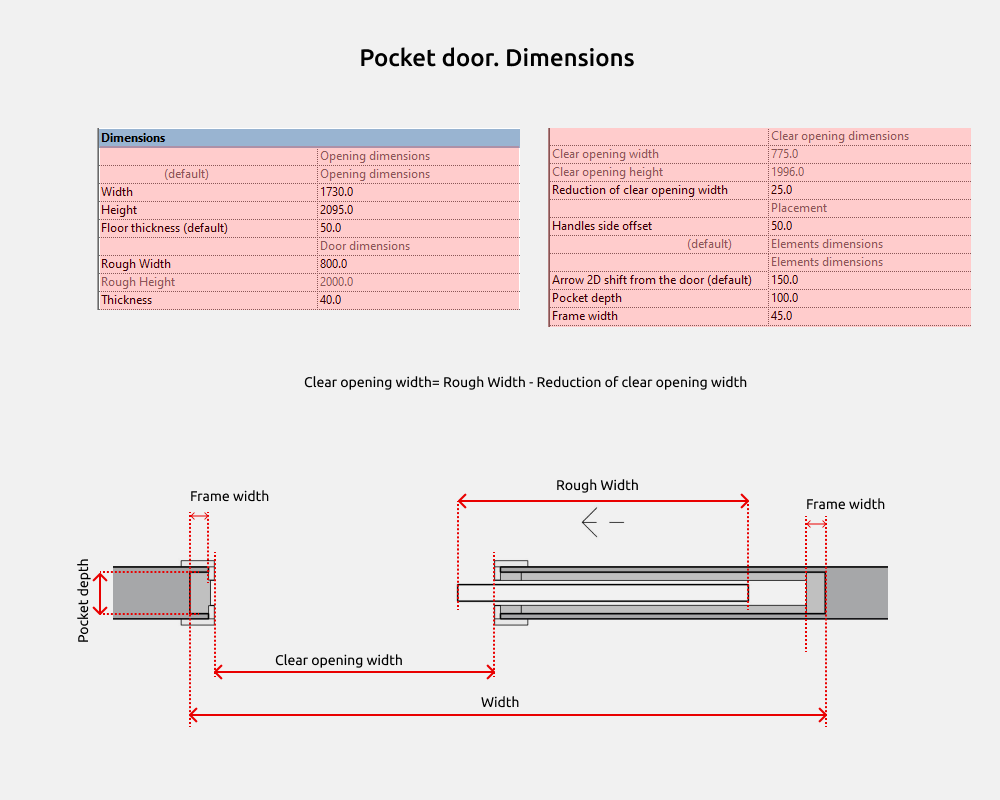
Clear opening width = Rough Width – Reduction of clear opening width
Bi-fold door
Compack door

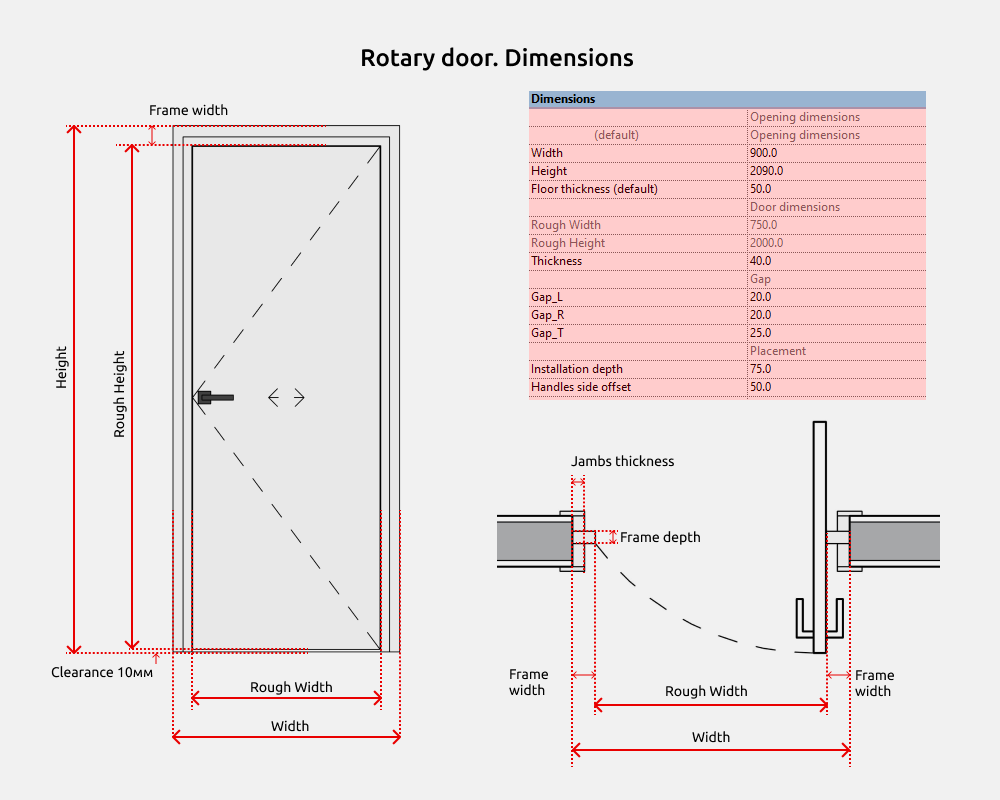
Rotary door
Pivot door
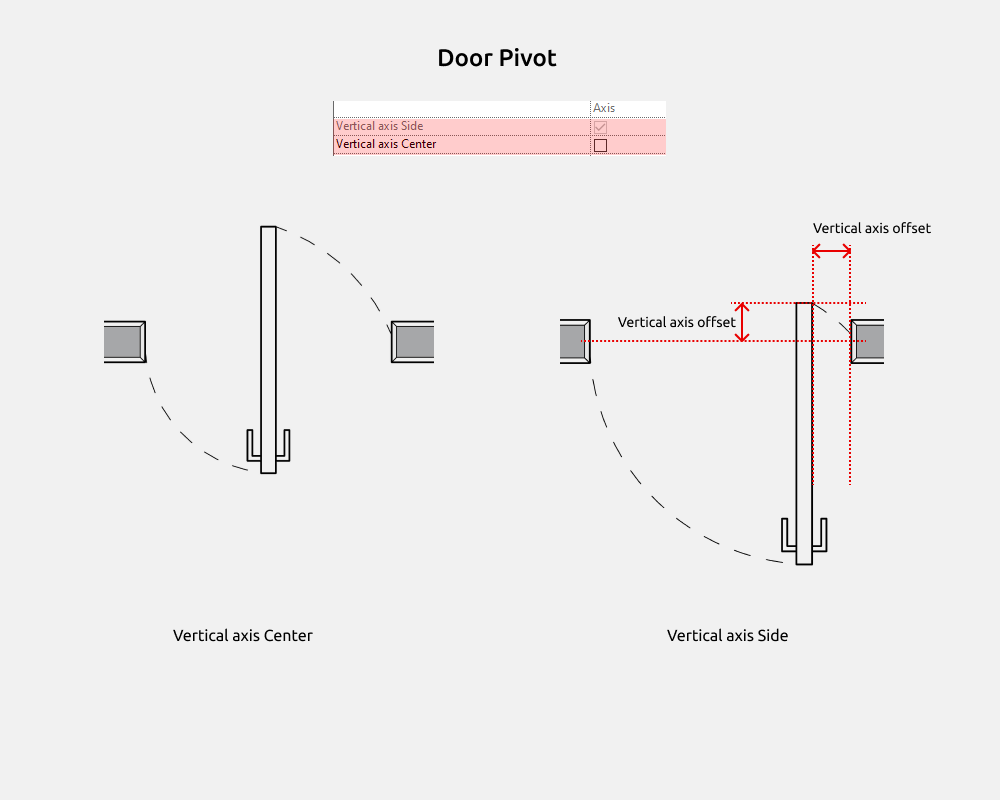
If the vertical axis is centered, the door is moved toward the center. If the vertical axis is to the side, the door is positioned closer to the edge of the opening; this distance can be adjusted (Vertical axis offset).
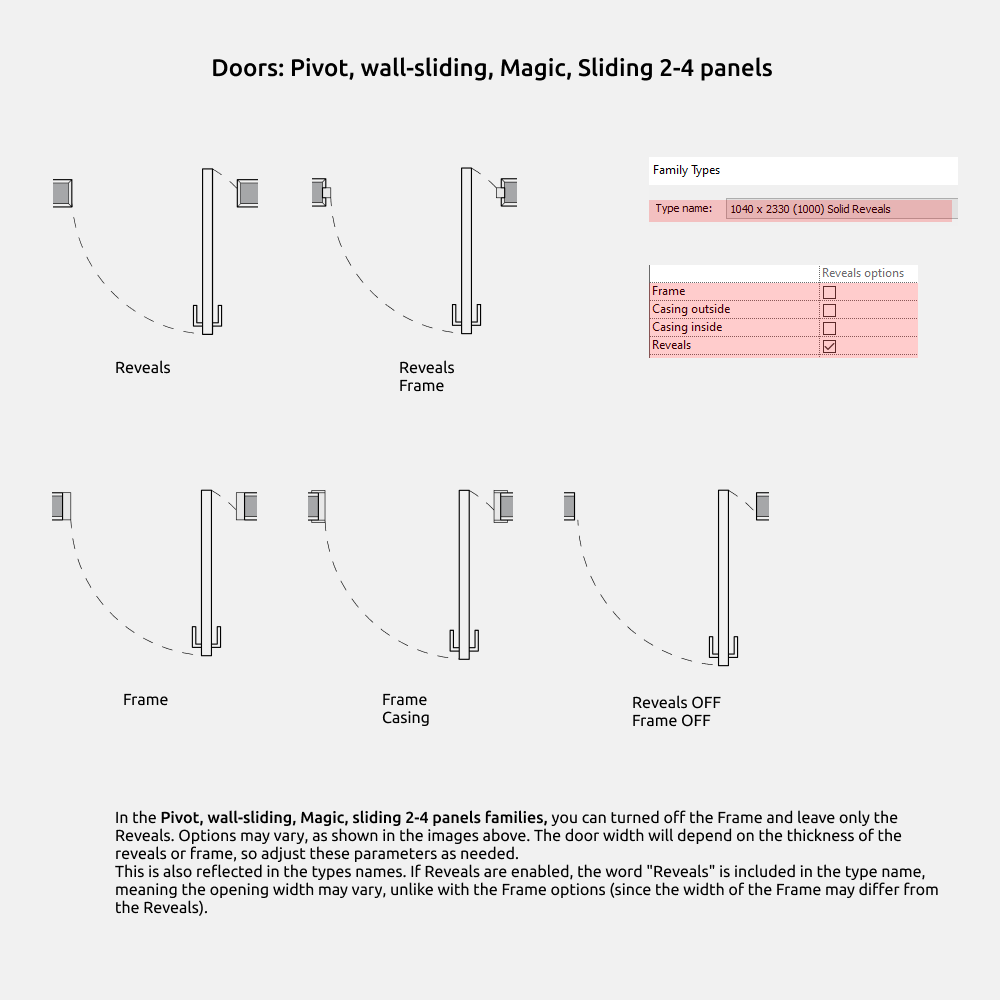
In the Pivot, wall-sliding, Magic, sliding 2-4 panels families, you can turn off the Frame and leave only the Reveals. Options may vary, as shown in the images above. The door width will depend on the thickness of the reveals or frame, so adjust these parameters as needed.
This is also reflected in the type’s names. If Reveals are enabled, the word "Reveals" is included in the type name, meaning the opening width may vary, unlike with the Frame options (since the width of the Frame may differ from the Reveals).
Wall-sliding door
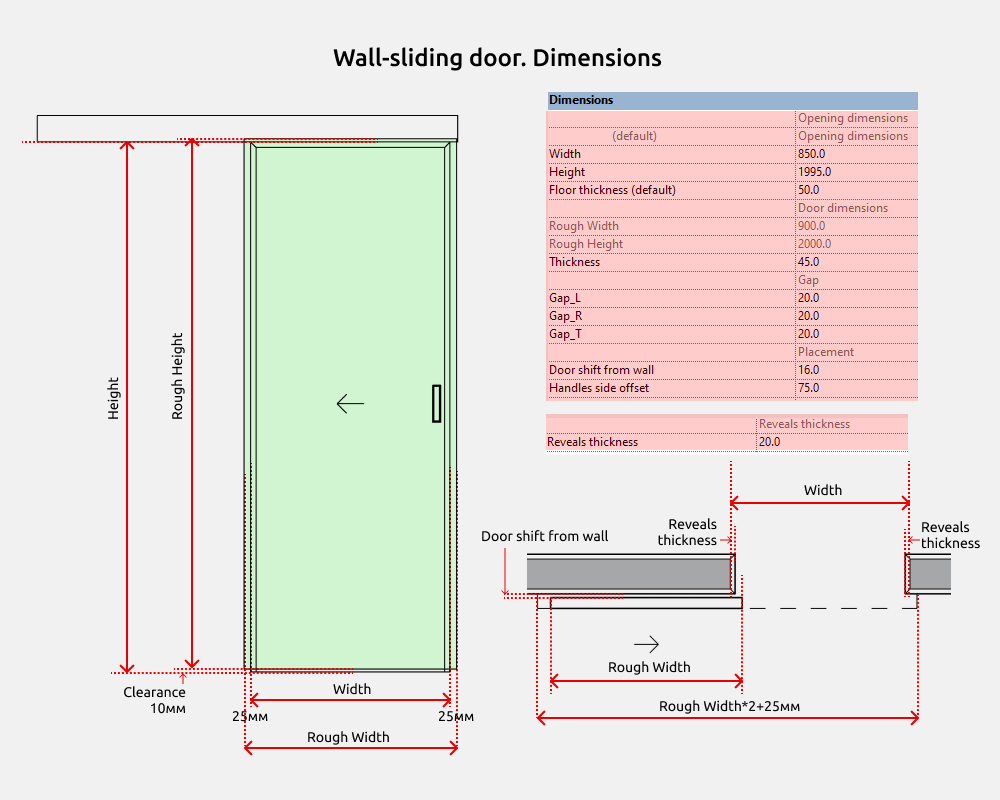
The door is 25mm wider than the opening on the left and right.
Rail width = Rough width *2 + 25мм + If the casings are wide, then the rail also becomes a little wider (to frame the casings).
Magic door
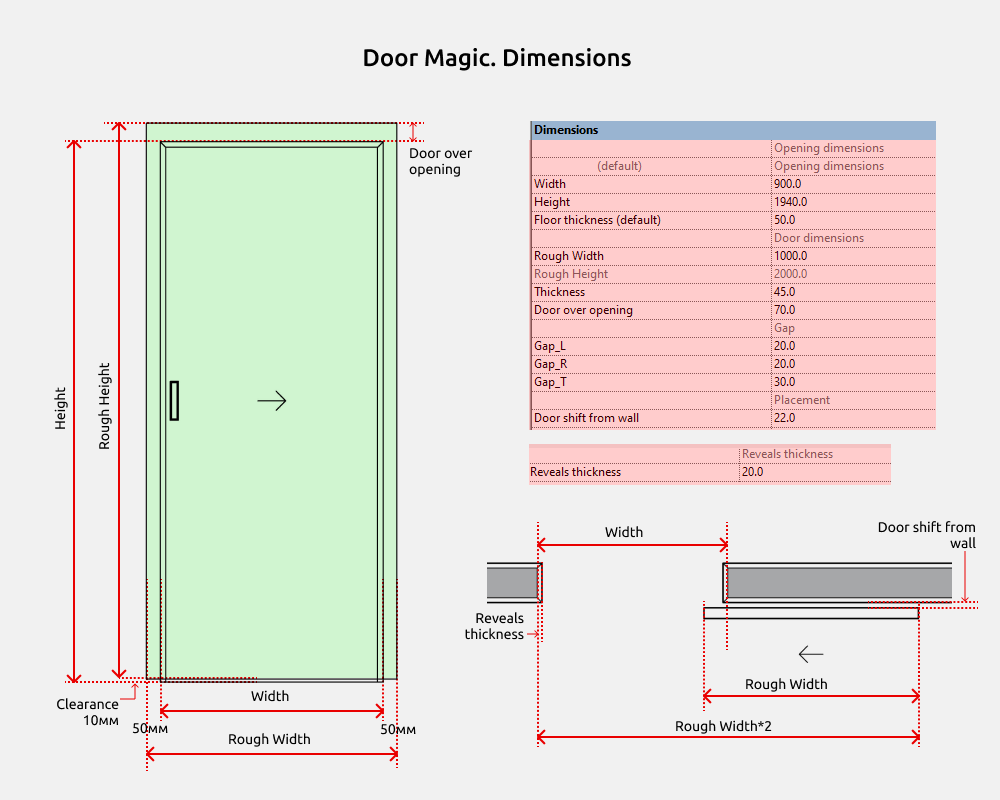
The door is 50mm wider than the opening on the left and right. And from above - on the Door over opening parameter.
Sliding 2 panels
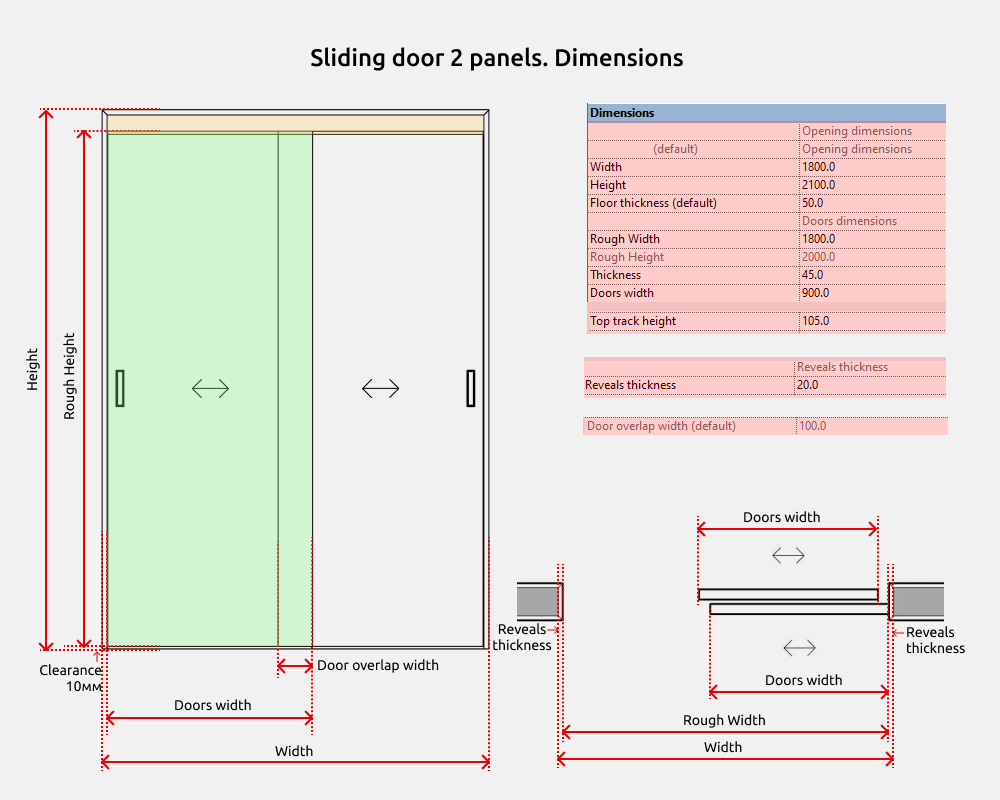
Rough width = Doors width * 2
Sliding 3 panels
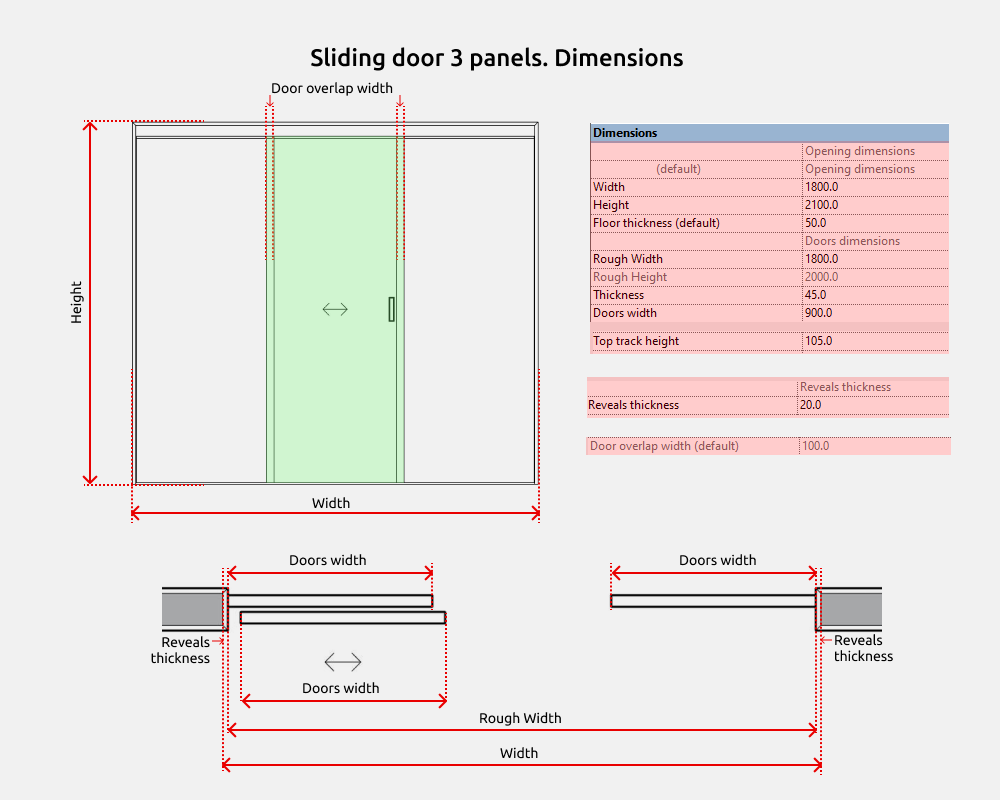
Rough Width = Doors width * 3
Sliding 4 panels

Rough Width = Doors width * 4
Exterior and technical doors
Exterior door and technical door families are combined into one group because they have the same standard sizes, are similar in parameters within the families, and are used to construct doors at the entrance to a room or house.
There is a difference in the visibility of some parameters:
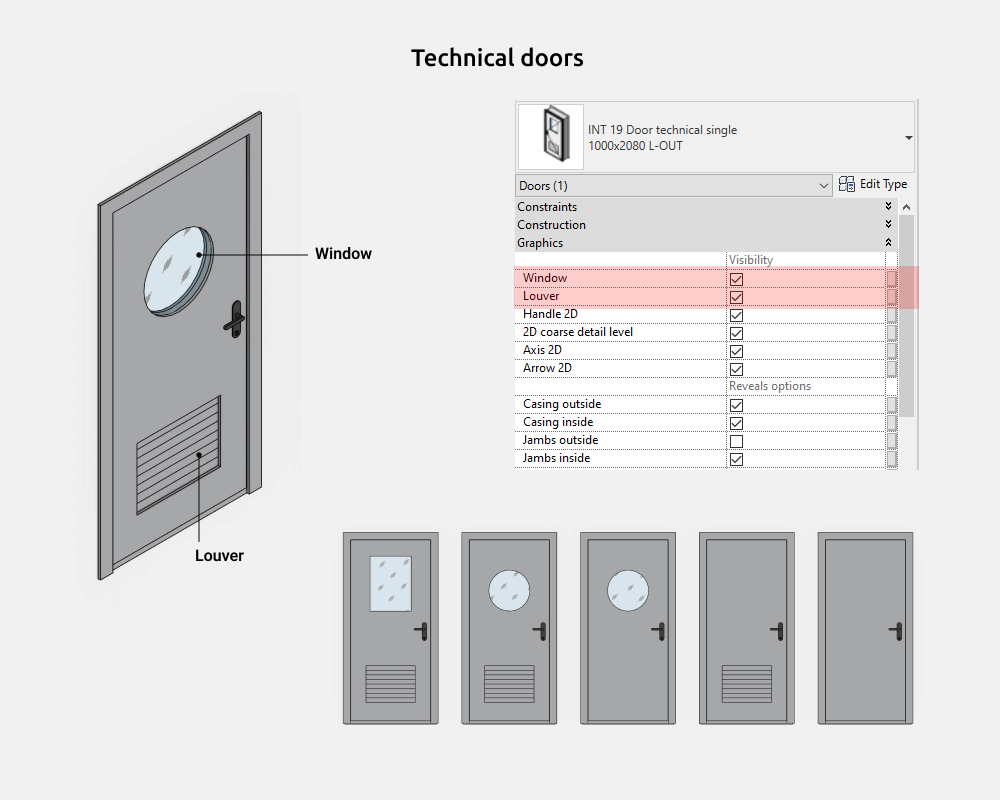
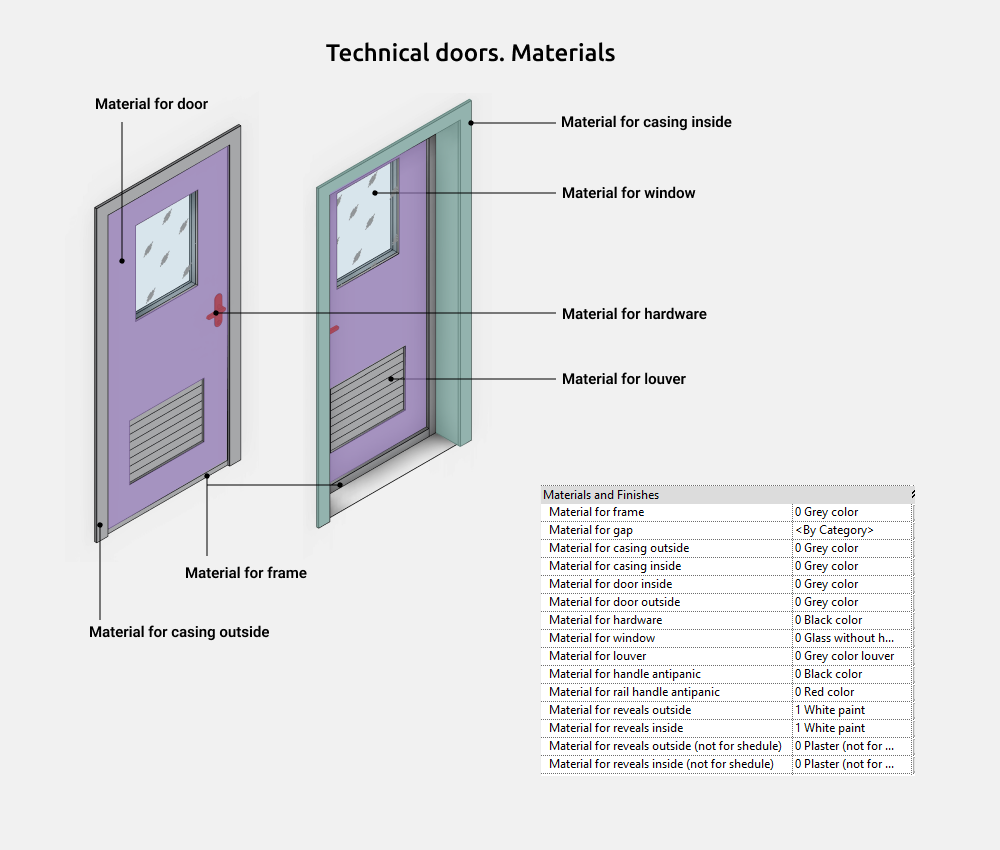
Exterior have: Door viewer, Upper lock, Mirror
Technical have: Window and Louver.
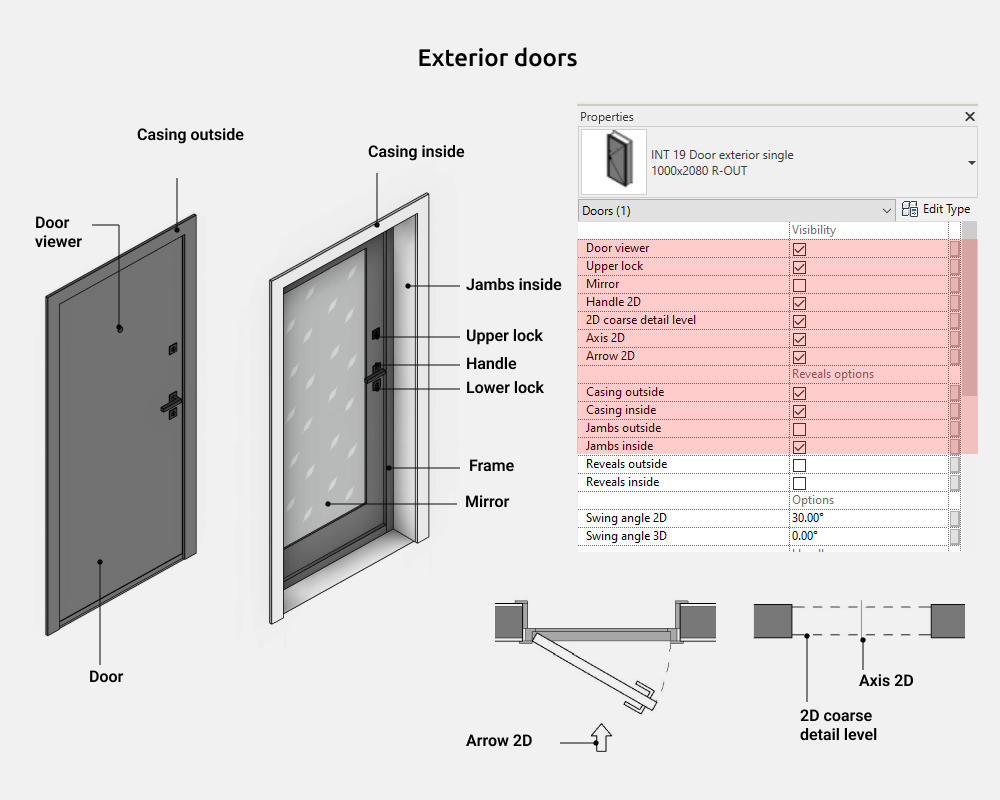
In the family you can on/off the following elements:
- Door viewer
- Upper lock
- Mirror
- 2D coarse detail level
- Axis 2D
- Arrow 2D
- Casing outside
- Casing inside
- Jambs outside
- Jambs inside
- Reveals outside
- Reveals inside
In the family you can on/off the following elements:
- Window
- Louver
- 2D coarse detail level
- Axis 2D
- Arrow 2D
- Casing outside
- Casing inside
- Jambs outside
- Jambs inside
- Reveals outside
- Reveals inside
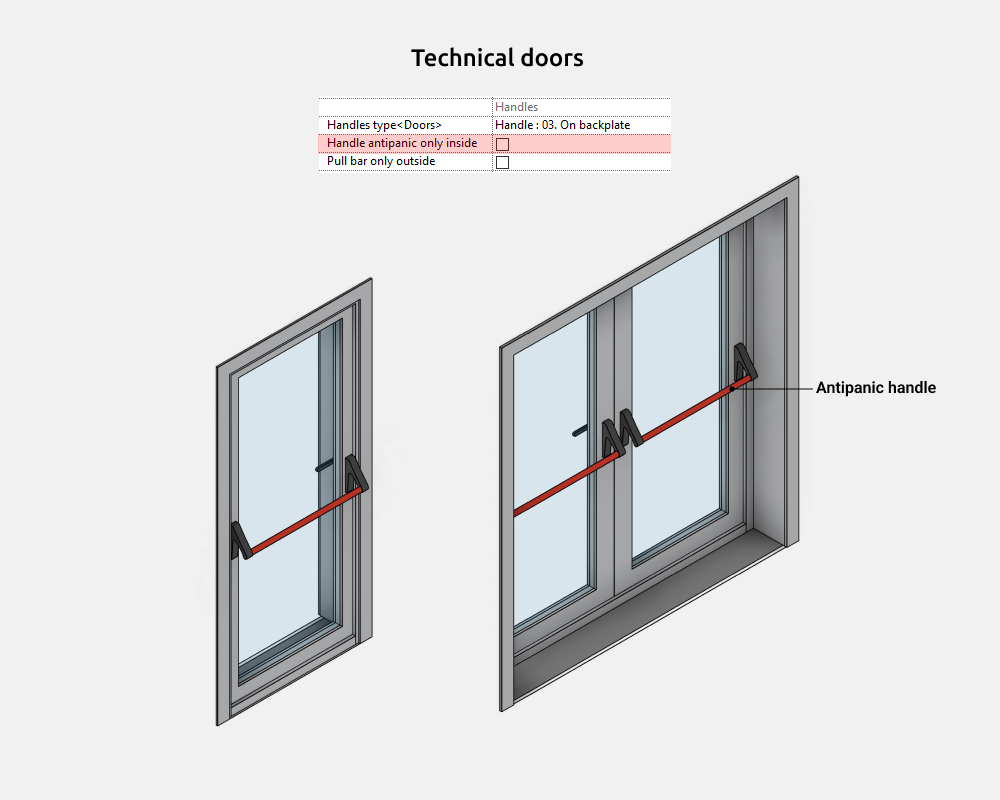
Antipanic handles have been added to the technical doors.
Dimensions
In the families of exterior and technical doors there are parameters Door unit and Gaps.
Door unit width = Width - Gap*2
Door unit height = Height – Gap*2
Rough Width and Rough Height are actually slightly smaller than the parameter values due to clearance of several mm around the perimeter. (So if the Rough Width is 880 mm, then the actual width is 874 mm.
Therefore, it's better to reference the dimensions to the reference planes rather than the door lines.)
Increasing the Door Thickness also increases the depth of the frame.
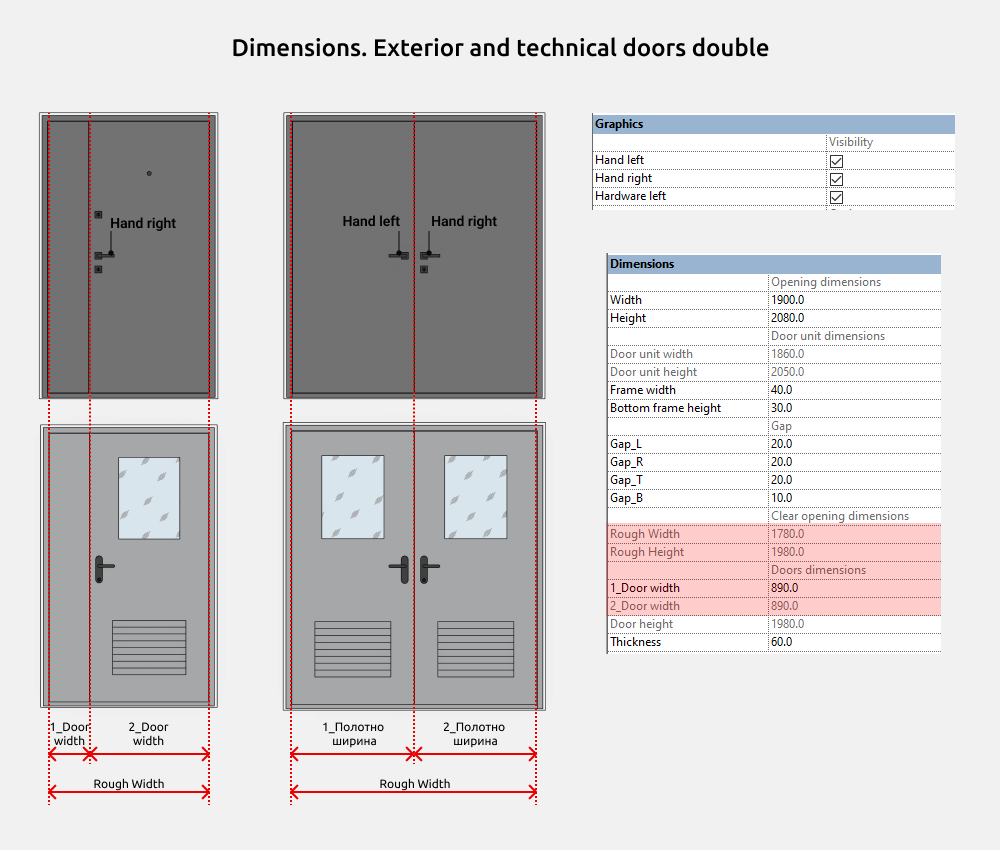
In double families there are both double doors and unequal double doors. Simply choose the right type 1.5x or 2x.
Door unit width = Width – Gap*2
Door unit height = Height – Gap*2
Clear opening dimensions:
Rough Width = 1_Door width + 2_Door Width
Rough Height = Door height
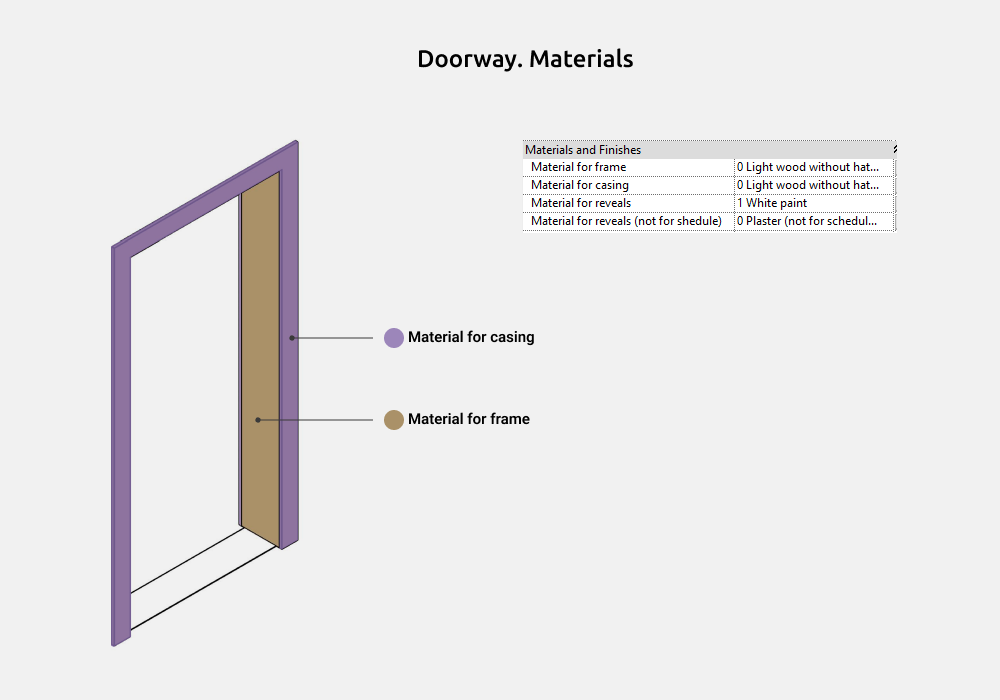
Materials
Doorway
A Doorway is an opening with a frame. The frame may have casing or reveals.
Types are named by Width and Height opening + form (1000х2100 Rectangle).
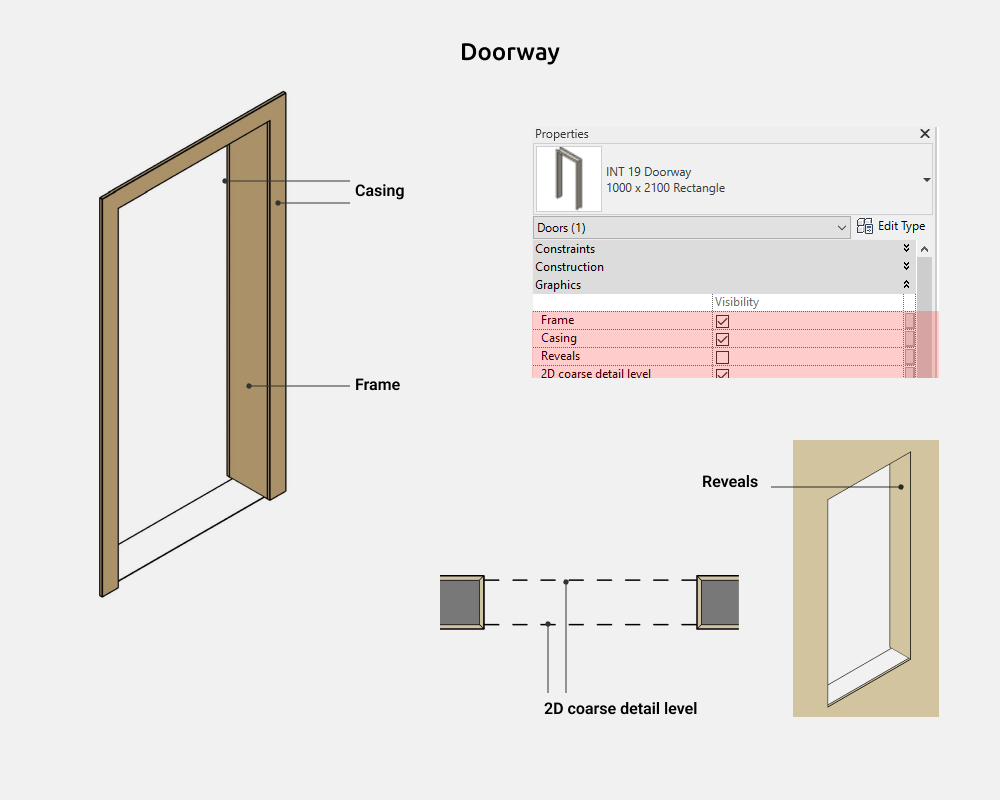
In the family you can on/off the following elements:
- Frame
- Casing
- Reveals
- 2D coarse detail level
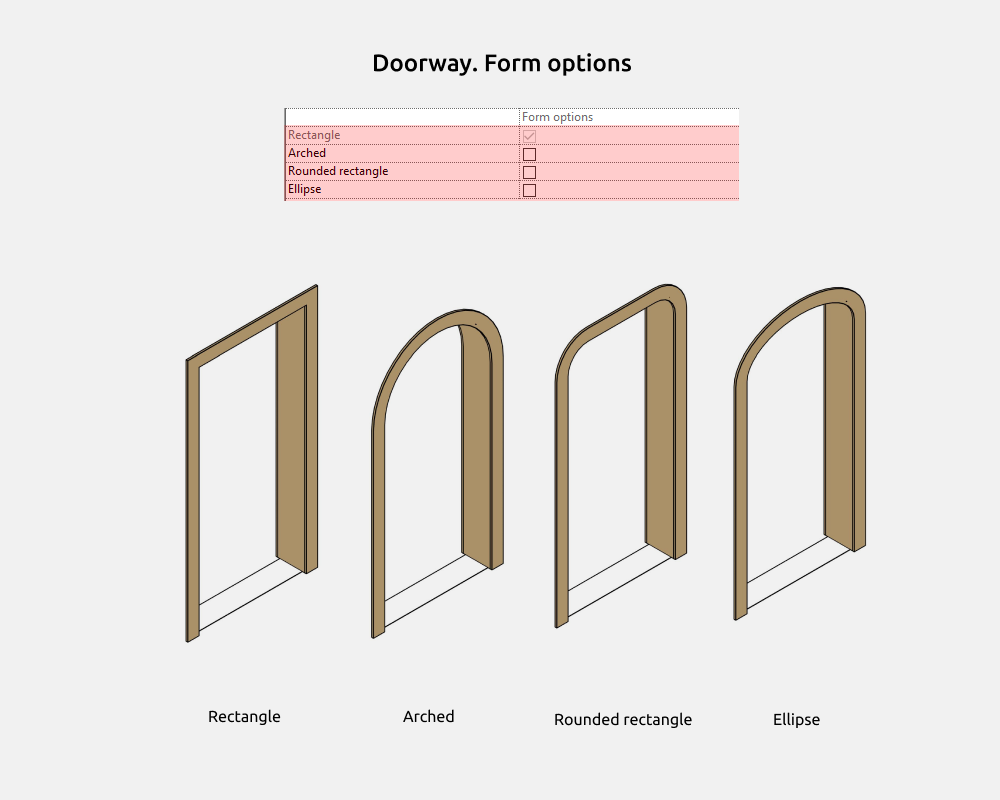
You can choose types with different form for opening:
- Rectangle
- Arched
- Rounded rectangle
- Ellipse
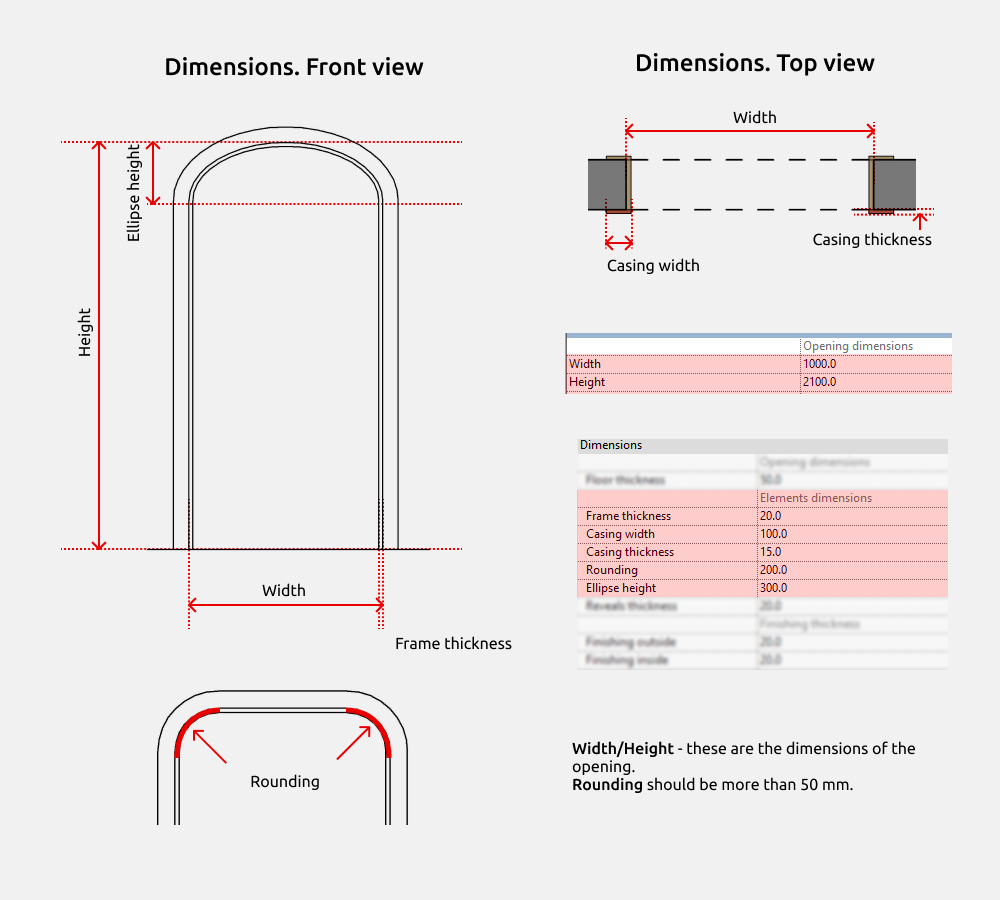
Width and Height - - these are the dimensions of the opening.
Rounding must be more than 50mm.
Door tag
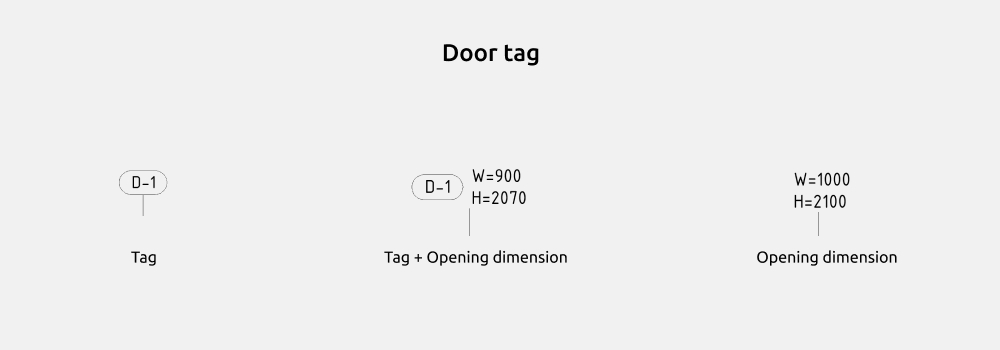
Door tag has 3 types:
- Tag
- Tag + Opening dimension
- Opening dimension
5. STYLING
Graphics settings
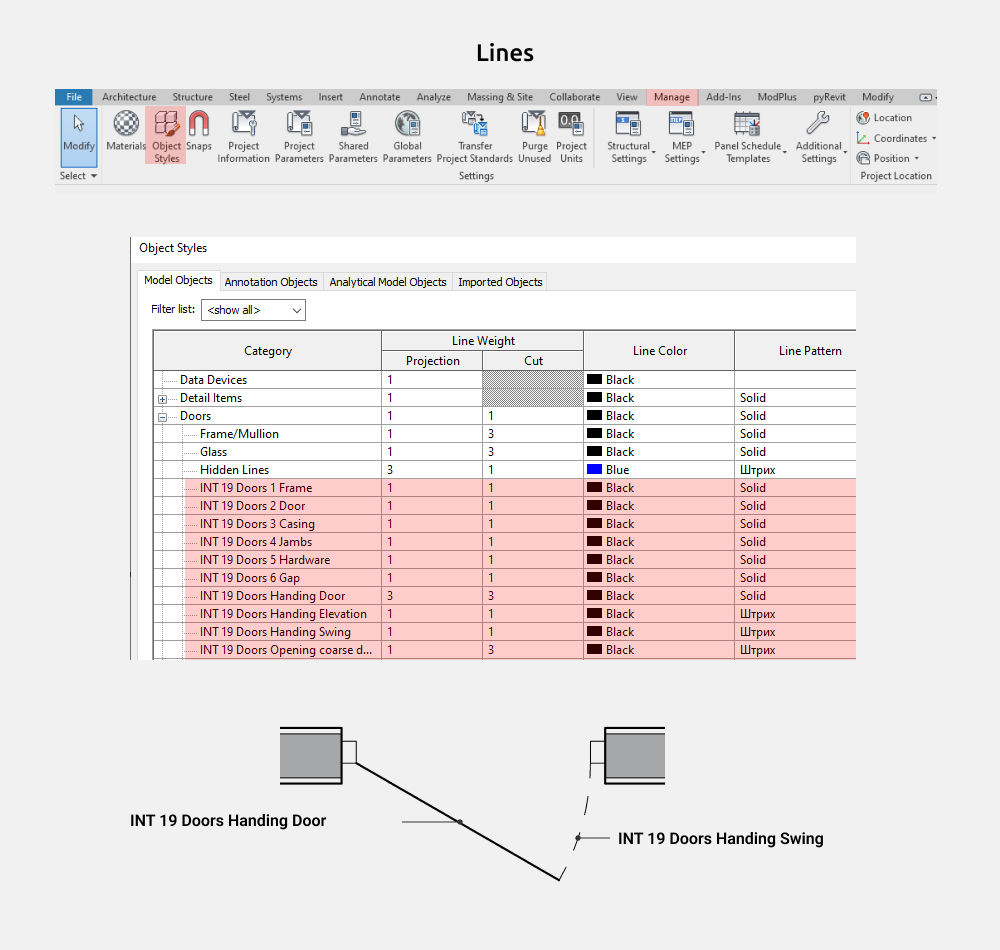
To change the color/weight/pattern of family lines, you need to go to Manage - Object Styles - Doors
¿Te gustan estas familias?
Estas familias forman parte del set completo de familias de Revit para diseñadores de interiores: todo lo que necesitas para modelar interiores, en un solo paquete.
Ver el set completo →